My Next Media Center Iteration: Intel NUC8i3BEH
My Raspberry Pi 4 based media center has some issues, which I was able to resolve by switching to an Intel NUC8i3BEH platform. I was able to make the device quiet despite of its fan, and set up everything to have live TV and PVR, a web browser, Spotify and other DRM content in a very usable and performant setup.
The first paragraph contains a lot of opinion and bla bla – for the setup guide skip here.
Why a New Media Center Again?
Nearly 7 years ago I started playing around with media centers: the first one Raspberry Pi based, then using Le Potato because of the need for HEVC hardware codec, and, after being frustrated with the limitations of Le Potato, a journey back to Raspberry after the Pi 4 came out. I’ve always been focused on KODI centered OS distributions like LibreELEC or CoreELEC. With Raspberry Pi 4, I diverted from that path and used a native Raspberry Pi OS install and put on top of it the KODI package. There are three large advantages that come with that approach:
- Fully fledged web browser (close KODI, use Chromium or Firefox ESR on the standard Pi desktop) – and with that: easy use of the German “Mediathek”. The KODI plugins for this have been a slow and very unstable affair all the time.
- Netflix, Spotify and other DRM content providers work just by installing the Widivine package – no tinkering with the cumbersome Netflix KODI plugin.
- The freedom to tap into the full Debian software packages – no restrictions from the stripped-down and kindof locked *ELEC-distributions anymore. Allows e.g. the use of VLC player.
Still, some frustrations remained:
- Closing KODI sounds easy, but KODI takes about 10 seconds to close down. Not a huge issue, but a bit annoying.
- System instabilities: After closing KODI, sometimes the desktop was missing the Task/Menu-bar. Restart required… Very annoying.
- Wonky playback in the browsers: With the hardware-decode optimized Chromium browser, most videos played without frame drops, but there were obvious difficulties with aligning the media framerate and the LCD monitor refresh rate, causing “micro-stops” in the pictures, e.g. when playing 24 fps video on the 60 Hz monitor. Workaround is to use the “Play in VLC” plugin. VLC does the job perfectly, but this really impacts ease of use.
- In general, the desktop UI on a Pi 4 does not feel very fluid/performant – long wait times, sub-par page scrolling, laggy Spotify UI etc.
- Bad reception of some channels with my WinTV dualHD USB DVB-T2 receiver: I live in about 1 km distance from the DVB-T2 broadcasting antenna and can actually see it from the windows of my living room, but still when receiving the 514 MHz multiplexer, I got signal problems in certain situations. I never figured out why this problem exists – I assumed it was power related and that the Raspberry was just not pushing out enough volts for stable operation, but even with a dedicated PSU for the USB receiver problems persisted.
Raspberry Pi 5: A (Potential) Disappointment
Enters: Raspberry Pi 5 – the surprise announcement gave me a short spark of excitement – I was hoping that with this incarnation the Raspberry would be powerful enough to give me a better general experience, and perhaps more hardware codecs, like VP9 or AV1 (like the Le Potato did). Turns out: Au Contraire Mon Capitan! They even dropped all hardware codecs except for HEVC! The engineers at the Raspberry Foundation claim that software decode is powerful enough, but with my Pi 4 experiences I had my doubts, and several forum posts and reviews seem to support my anxiety: Yes, it can decode quite a bit, but you need optimized software, must not get too demanding, and the CPU will have to do quite some heavy lifting. There are still reports of the Pi 5 dropping frames with YouTube 1080p@30 Hz videos… Honestly I do not understand the decision of the Foundation to drop the hardware decoders. Admittedly, the Pi 5 at the time of this writing is very new and we can expect quite a bit of development and improvements, but for the time being I felt strongly discouraged to try to get myself a Pi 5.
And five more factors influenced my decision to once again divert from the Raspberry family:
- Necessity to have a fan: Yes, you can run Pi 5 without a fan, but when using CPU heavy loads (and media decode qualifies as such), it is strongly recommended. Meaning: Noise!
- Me reading about thin clients as a good alternative for many Raspberry applications. I was not aware that most thin clients consume similar amounts of power when idle as compared to a Raspberry. The Raspberries – even the Pi 5 with now ~2.7 W at idle – still beat most thin clients, but only by a narrow margin. And with a thin client you get the full ecosystem of x86 specific applications (e.g. the Spotify fat client), a BIOS/CPU with power states that allow for a better power management, potentially reducing power consumption (admittedly, the Pi 5 has the potential for that also), and better standard hardware interfaces, like SATA, more PCI lanes, more USB etc.
- Price tag: The Raspberry Pi 5 is not a cheap affair anymore. The board itself with a bit of RAM plus need for a PD power supply plus fan etc. easily sets you back 100+ bucks – a used Thin client of similar performance as the Pi 5 is 30-80 € on eBay! For the 100+ € of the full Pi 5 purchase you even get thin clients that are leaving the Pi 5 behind in power by quite some margin.
- The unexpected opportunity to get a used Intel NUC8i3BEH from my company for a bargain. Right before Christmas – so plenty of time at my hands to try it out.
- Availability: getting a Pi 5 is not easy currently…
As a last remark on Pi 5: I somehow feel that the Raspberries lose some of their USPs. They are no longer cheap, their power consumption is not strictly low anymore, and the gain in performance is not that immense that they become a real alternative to other options. Where’s the niche? The 40-pin GPIO is certainly something useful, but even with the introduction of the RP1 I/O chip they still have no ADC available (although the RP1 could do it – that’s another decision I just do not understand – why do they not expose the existing ADC???). My guess is that people tinkering in hardware will stay with the Pi 3’s – they seem to be the sweet spot of performance, power consumption and price point to me. And to the credit of the Raspberry Foundation: It is very cool that these boards remain available, that they are still fully supported by the most recent OS, and of course the Raspberry Community is a huge plus for the ecosystem. Still, I feel the Pi 5 somewhat misses many targets…
Intel NUC8i3BEH
How does the NUC (which dates back to 2018/19) compare to the Raspberry Pi 5 in relevant areas?
- Power consumption (based on claims from web pages – I think at some point I need to get myself a power meter to compare my specific setups): Pi 5: ~2.7 W idle – Intel NUC: ~3 W idle –> Not much of a difference
- Fan: Both have one (See later for how to make the NUC practically silent)
- CPU: Pi 5: 4 core @ 2.4 GHz – Intel NUC: 2 core with hyperthreading @ 3.6 GHz (max). Many differences in cache, RAM speed etc. – some where the Pi 5 is ahead, some where the NUC has more beef.
- GPU: Pi 5: HEVC hardware codec (decode only) – that’s it. Intel NUC: H.264, HEVC, VP9 and some more as hardware codecs, most both en- and decode.
I do not have a Pi 5 to compare to, but comparing the NUC to the Pi 4, it is performing at least two orders of magnitude better, so my gut feeling is that it beats the Pi 5 still by quite some margin – in arbitrary, subjective “feels faster” units admittedly (for Germans: I mean the “Schwuppdizität” of course!). But basically any of the frustrations listed earlier are addressed, and the new system is a constant source of joy, hopefully my last iteration of a media center for a long time (Well, let’s see what the Pi 6 will bring…)!
To be fair: Looking on eBay, the NUC8i3BEH is to be found for ~200 € currently, so more expensive than the Pi 5 including all parts needed.
Setting up a Quiet Media PC With the Intel NUC8i3BEH
Design Considerations And Goals
- Needs to be quiet!
- Linux based (chose Debian 12 “Bookworm” since Raspberry Pi uses it and I’m familiar with it)
- Need a web browser (so no *ELEC-Distro)
- Use my WinTV dualHD USB DVB-T2 receiver
- Want to use tvheadend for DVB-T2 handling and PVR
- Want to use KODI plus tvheadend frontend addon for Live TV and PVR recordings consumption
- Want to have VLC available
- Want to use Netflix, Spotify and potentially other DRM-using media
- Want the TV recordings to be available in my home network as SMB shares for anyone
- Want to have the UI scaled so that I can use it sitting a few meters away with a wireless keyboard/touchpad combo (I use the Logitech K400 Plus which works plug’n’play – but be aware of potential security issues!)
Future plan:Use Power states to put the unit to deep sleep if not used, but wake up on its own when some TV recording is due [Yes, I still do recordings…]
Let’s walk through all of that…
Getting it Quiet
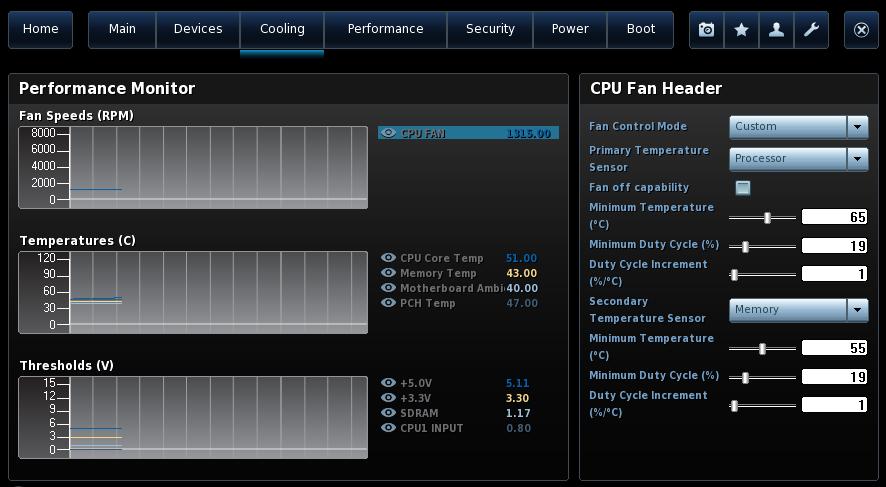
The NUC has a fan, and on standard BIOS settings, it spins up every few minutes, even when the unit sits idle (OS/GUI running of course), and it is clearly audible, with a somewhat high-pitched whistle. Not good enough for my living room – at first I was a bit disappointed and discouraged. But the BIOS let’s you do a lot about the fan control. What worked well for me in the end (BIOS screenshots below):
- Switching off the “Fan off capability”
- Setting the minimum duty cycle to 19% with 1% increments per °C
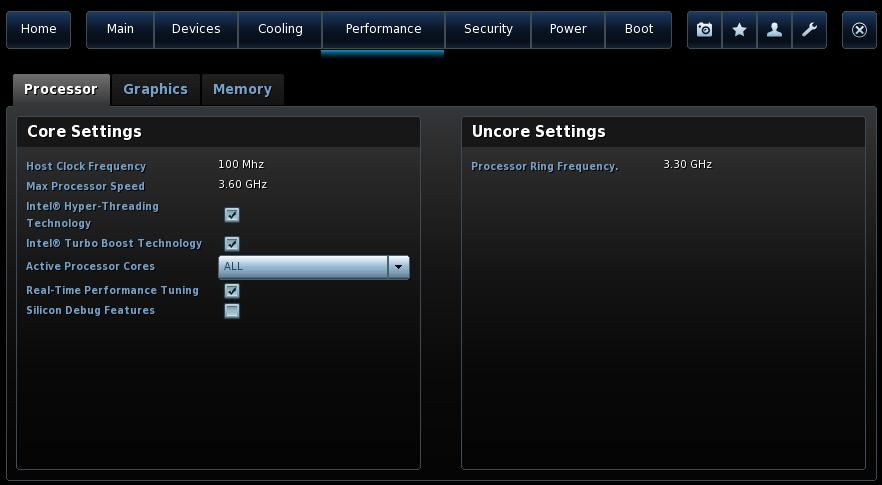
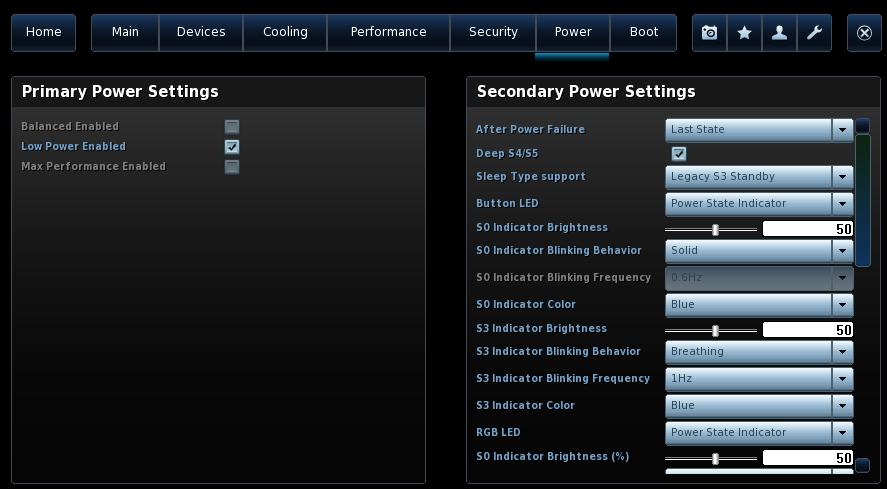
- Selecting the “low power” profile (but still have turbo boost on!)
These settings make the fan rotate continuously at ~1250 RPM (+/-), which is basically inaudible (at least for my unit and my ears). I need to put my ear right next to the fan outlet to hear a very low-key swish of air. Even running demanding jobs like software updates, watching a movie or TV, browsing the internet with script-heavy pages etc. has never caused the fan to spin up (which does not mean that this still may happen, I did not go very demanding yet… still, all relevant scenarios are quiet!). It seems that the 1250 RPM keep the CPU cool enough at all times, and avoid it getting hot in first place. But only in the “low power” profile! if you go for other profiles, the fan will come up ever once in a while. I personally am fully satisfied with the “low power” profile – system performance is still very satisfying!
Here are screenshots of the relevant BIOS settings:
Having achieved this, encouraged me to do the work of setting up all the rest.
Linux Setup
Important Remarks
This guide assumes that your home network is protected from the outside internet by a firewall that only allows outgoing traffic, but no inbound connections. I’ll instruct you to set up server software that will be open to any network that can reach your media center. So please make sure that your media center is not exposed to the internet. Unless of course you understand what you’re doing.
Most command-line steps I give here require root rights. I do not add sudo to each of those lines – my recommendation is to set up your standard user as admin (see below), then do sudo bash and run your commands in that bash shell then. Security-aficionados will chastise me for that – I don’t care 🙂
Finally, the instructions below will make you add the repositories of tvheadend and Spotify to the list of trusted packet sources. This may be considered as a potential security risk. IMHO if you install the software, you already extend enough trust to the programmers that adding their repository is not a huge issue anymore. On the plus side you get automatic updates, which I guess is adding another kind of security.
Base Install
Opposed to the uncounted Linux installs I did on a Raspberry, you do not get a ready-made image to put on a SD card, but an ISO image for a net install (there are of course other options, but I feel this one is the best suited here). Pick the “64-Bit-PC Netinst ISO” from the page I linked in. I put it onto a bootable USB pen drive using Rufus. You need to set the boot config of the NUC to boot from USB, and off you go. The install is wizard-controlled and easy to use – just make sure you have a network (WiFi or cable) available, since the packages are fetched from the internet during install. I was pleasantly surprised how fast the install runs nowadays.
Two notable things: The SSH server is not selected by default – if you want it, select it at the regarding step. And: The choice of the window manager is more important than I thought (see below)!
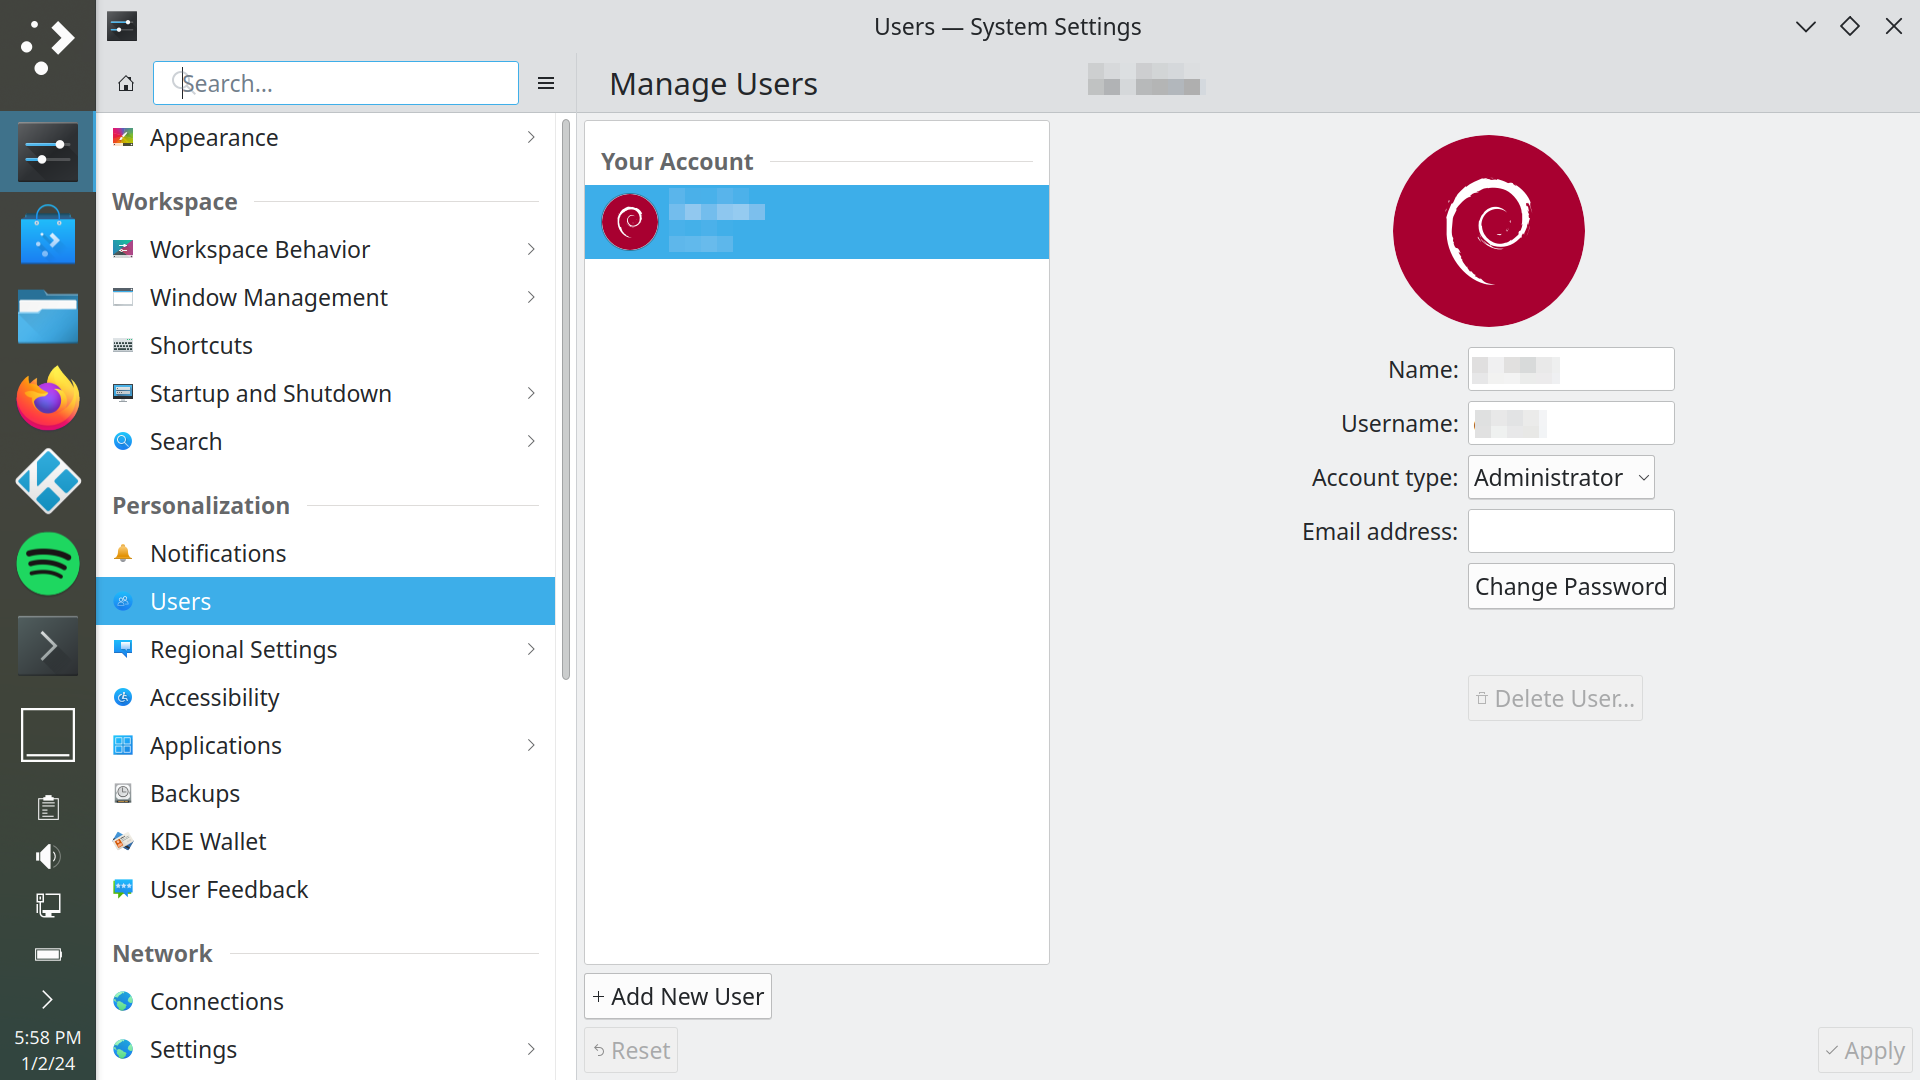
Optional: Make the Default User Admin:
Several tasks below require root access. You can either use the root user, or you can make your standard user “Administrator”, which allows you to use the sudo command for tasks that require elevation. With KDE it is very simple, you can use the account settings and change the user type to Administrator. For other window managers you may need to add the user to the sudo group with the command usermod -aG sudo <your user>. For this you need to be root once, which you can achieve with the command su – root. The effect for me was only there after a reboot (I guess because you would also need to edit the sudoers file, which seems to happen automagically during reboot after group change).
As said, with KDE it is totally simple – see this screenshot:
The Window Manager
You get quite a few window managers to choose from during install. In the end I went for KDE, and if you just follow me here, you may skip reading the rest of this sub-section where I explain the “why”, which of course is a lot of opinion voiced.
On first try I started with the suggested standard, GNOME. I basically did most of the media center setup using GNOME, only in the end realizing two things: A) I really do not like the concept of app-launcher and workspace/window handling they introduce as a default. B) The screen scaling options looked perfect at first, but digging into the details, I hit strange limits.
So I thought: No prob, just install a different window manager on top and change the default to it. I went for LXDE, which is easily installed with apt install … and update-alternatives –config x-window-manager. LXDE immediately made me discard it – too old fashioned. So I tried switching to KDE, same method – only it never started KDE! I ended up in some strangely distorted version of GNOME… After trying a few things with no success, I decided to revert to the original GNOME setup – only to find that it was still not the original GNOME setup, but some distorted version of it… So it seems that window-manager switching is not as robust as the commands suggest.
In the end I simply did OS re-installs from scratch to try out some of the window manager options offered during install – which was fine, since the OS install is really a quick thing. I then checked A) if I like the look and feel of the UI (very much a matter of personal opinion) and B) how flexible the scaling options were – which are surprisingly different between the window managers! For me, KDE works best, and now having done all kinds of fine tuning and adjustments, I am really satisfied with the real estate it leaves me on screen, how I can handle the different applications and the general practical usability from a few meters away.
WinTV dualHD DVB-T2 Receiver Install (may be Interesting for other Receivers as Well)
This USB DVB-T2 and cable TV receiver by Hauppauge is natively supported from Linux kernel 4.17 on, however, the non-free firmware needs to be added manually. It is a bit easier using Ubuntu, Hauppauge seems to support this better than Debian, but I’m not such a huge Ubuntu fan. The firmware download page unfortunately is only available in German, so here’s the direct download link. A bit more info in English can be found on linuxtv.org. The downloaded firmware needs to be copied into /usr/lib/firmware. Then it’s plug and play – dmesg output should look like this:
|
1 2 3 4 5 6 7 8 9 10 11 12 13 14 15 16 17 18 19 20 21 22 23 24 25 26 27 28 29 30 31 32 33 34 35 36 37 38 39 40 41 42 43 44 45 46 47 48 49 50 51 52 53 54 55 56 57 58 59 60 61 62 63 64 65 66 67 68 69 70 71 72 73 74 75 76 77 78 79 80 |
[ 5.163150] em28xx 1-4:1.0: EEPROM ID = 26 00 01 00, EEPROM hash = 0xd5e9c94c [ 5.163160] em28xx 1-4:1.0: EEPROM info: [ 5.163164] em28xx 1-4:1.0: microcode start address = 0x0004, boot configuration = 0x01 [ 5.170645] em28xx 1-4:1.0: AC97 audio (5 sample rates) [ 5.170652] em28xx 1-4:1.0: 500mA max power [ 5.170655] em28xx 1-4:1.0: Table at offset 0x27, strings=0x0e6a, 0x1888, 0x087e [ 5.228818] em28xx 1-4:1.0: Identified as Hauppauge WinTV-dualHD DVB (card=99) [ 5.232016] tveeprom: Hauppauge model 204109, rev B3I6, serial# 14xxx145 [ 5.232021] tveeprom: tuner model is SiLabs Si2157 (idx 186, type 4) [ 5.232024] tveeprom: TV standards PAL(B/G) NTSC(M) PAL(I) SECAM(L/L') PAL(D/D1/K) ATSC/DVB Digital (eeprom 0xfc) [ 5.232027] tveeprom: audio processor is None (idx 0) [ 5.232029] tveeprom: has no radio, has IR receiver, has no IR transmitter [ 5.232033] em28xx 1-4:1.0: We currently don't support analog TV or stream capture on dual tuners. [ 5.232039] em28xx 1-4:1.0: dvb set to bulk mode. [ 5.288861] em28xx 1-4:1.0: chip ID is em28174 [ 6.506881] em28xx 1-4:1.0: EEPROM ID = 26 00 01 00, EEPROM hash = 0xd5e9c94c [ 6.506885] em28xx 1-4:1.0: EEPROM info: [ 6.506886] em28xx 1-4:1.0: microcode start address = 0x0004, boot configuration = 0x01 [ 6.513214] em28xx 1-4:1.0: AC97 audio (5 sample rates) [ 6.513217] em28xx 1-4:1.0: 500mA max power [ 6.513218] em28xx 1-4:1.0: Table at offset 0x27, strings=0x0e6a, 0x1888, 0x087e [ 6.576838] em28xx 1-4:1.0: Identified as Hauppauge WinTV-dualHD DVB (card=99) [ 6.579235] tveeprom: Hauppauge model 204109, rev B3I6, serial# 14xxx145 [ 6.579239] tveeprom: tuner model is SiLabs Si2157 (idx 186, type 4) [ 6.579241] tveeprom: TV standards PAL(B/G) NTSC(M) PAL(I) SECAM(L/L') PAL(D/D1/K) ATSC/DVB Digital (eeprom 0xfc) [ 6.579243] tveeprom: audio processor is None (idx 0) [ 6.579244] tveeprom: has no radio, has IR receiver, has no IR transmitter [ 6.579248] em28xx 1-4:1.0: dvb ts2 set to bulk mode. [ 6.779036] usbcore: registered new interface driver em28xx [ 6.816083] em28xx 1-4:1.0: Binding DVB extension [ 6.831551] i2c i2c-8: Added multiplexed i2c bus 11 [ 6.831555] si2168 8-0064: Silicon Labs Si2168-B40 successfully identified [ 6.831557] si2168 8-0064: firmware version: B 4.0.2 [ 6.839476] si2157 11-0060: Silicon Labs Si2157 successfully attached [ 6.839495] dvbdev: DVB: registering new adapter (1-4:1.0) [ 6.839498] em28xx 1-4:1.0: DVB: registering adapter 0 frontend 0 (Silicon Labs Si2168)... [ 6.839503] dvbdev: dvb_create_media_entity: media entity 'Silicon Labs Si2168' registered. [ 6.839821] dvbdev: dvb_create_media_entity: media entity 'dvb-demux' registered. [ 6.841600] em28xx 1-4:1.0: DVB extension successfully initialized [ 6.841605] em28xx 1-4:1.0: Binding DVB extension [ 6.847173] i2c i2c-10: Added multiplexed i2c bus 12 [ 6.847176] si2168 10-0067: Silicon Labs Si2168-B40 successfully identified [ 6.847178] si2168 10-0067: firmware version: B 4.0.2 [ 6.850313] si2157 12-0063: Silicon Labs Si2157 successfully attached [ 6.850335] dvbdev: DVB: registering new adapter (1-4:1.0) [ 6.850338] em28xx 1-4:1.0: DVB: registering adapter 1 frontend 0 (Silicon Labs Si2168)... [ 6.850342] dvbdev: dvb_create_media_entity: media entity 'Silicon Labs Si2168' registered. [ 6.850659] dvbdev: dvb_create_media_entity: media entity 'dvb-demux' registered. [ 6.852262] em28xx 1-4:1.0: DVB extension successfully initialized [ 6.852267] em28xx: Registered (Em28xx dvb Extension) extension [ 6.861570] em28xx 1-4:1.0: Registering input extension [ 6.892823] Registered IR keymap rc-hauppauge [ 6.892987] rc rc0: Hauppauge WinTV-dualHD DVB as /devices/pci0000:00/0000:00:14.0/usb1/1-4/1-4:1.0/rc/rc0 [ 6.893031] rc rc0: lirc_dev: driver em28xx registered at minor = 0, scancode receiver, no transmitter [ 6.893087] input: Hauppauge WinTV-dualHD DVB as /devices/pci0000:00/0000:00:14.0/usb1/1-4/1-4:1.0/rc/rc0/input22 [ 6.893146] em28xx 1-4:1.0: Input extension successfully initialized [ 6.893149] em28xx 1-4:1.0: Remote control support is not available for this card. [ 6.893150] em28xx: Registered (Em28xx Input Extension) extension [ 7.555358] si2168 10-0067: firmware: direct-loading firmware dvb-demod-si2168-b40-01.fw [ 7.555362] si2168 10-0067: downloading firmware from file 'dvb-demod-si2168-b40-01.fw' [ 7.780258] si2168 10-0067: firmware version: B 4.0.11 [ 7.784510] si2157 12-0063: found a 'Silicon Labs Si2157-A30 ROM 0x50' [ 7.784538] si2157 12-0063: firmware: failed to load dvb_driver_si2157_rom50.fw (-2) [ 7.784552] si2157 12-0063: firmware: failed to load dvb_driver_si2157_rom50.fw (-2) [ 7.784566] si2157 12-0063: firmware: failed to load dvb-tuner-si2157-a30-01.fw (-2) [ 7.784577] si2157 12-0063: firmware: failed to load dvb-tuner-si2157-a30-01.fw (-2) [ 7.784580] si2157 12-0063: Using ROM firmware. [ 7.832120] si2157 12-0063: firmware version: 3.0.5 [ 7.835240] em28xx 1-4:1.0: DVB: adapter 1 frontend 0 frequency 0 out of range (48000000..870000000) [ 7.838778] si2168 8-0064: firmware: direct-loading firmware dvb-demod-si2168-b40-01.fw [ 7.838781] si2168 8-0064: downloading firmware from file 'dvb-demod-si2168-b40-01.fw' [ 8.049873] si2168 8-0064: firmware version: B 4.0.11 [ 8.054103] si2157 11-0060: found a 'Silicon Labs Si2157-A30 ROM 0x50' [ 8.054120] si2157 11-0060: firmware: failed to load dvb_driver_si2157_rom50.fw (-2) [ 8.054129] si2157 11-0060: firmware: failed to load dvb_driver_si2157_rom50.fw (-2) [ 8.054140] si2157 11-0060: firmware: failed to load dvb-tuner-si2157-a30-01.fw (-2) [ 8.054147] si2157 11-0060: firmware: failed to load dvb-tuner-si2157-a30-01.fw (-2) [ 8.054150] si2157 11-0060: Using ROM firmware. [ 8.102411] si2157 11-0060: firmware version: 3.0.5 [ 8.105848] em28xx 1-4:1.0: DVB: adapter 0 frontend 0 frequency 0 out of range (48000000..870000000) |
So far I have no reception problems with the 514 MHz mux (as I had with the Raspberry), but admittedly I only use the device now since a few days… If my problems reoccur, I’ll update this post.
tvheadend Install
I was a bit surprised that tvheadend is not part of the Debian standard packages. Nevertheless, it is easy to install, just follow instructions on on the tvheadend APT repositories page. No issues at all, and you can immediately run the initial setup of tvheadend.
KODI, tvheadend PVR Addon and VLC
apt install kodi kodi-pvr-hts vlc
You can now start KODI and configure it to your liking. For connecting the PVR addon to tvheadend, use 127.0.0.1 as address, and everything else as you chose when you did the initial tvheadend setup.
Nice: Other than on Raspberry OS, you can leave KODI running, and with Alt-TAB or the Windows-Key you can pick up other applications in parallel! No need to leave KODI anymore if you want to, e.g., use the browser! I really like – not the least since leaving KODI on the NUC still takes several seconds.
Spotify
On my Raspberry Pi I used the web player, or the Chromium App respectively, which is basically the same. And they are fine – if you want minimum impact by closed source, opt for that. There are three things that you get on top if you use the Spotify fat client:
- Seamless playlists, i.e. if the album contains tracks that should be played without interruption at the end of a track, this only works with the fat client.
- Selection of audio quality – the web player has no control to influence audio quality. The fat client lets you select “Auto”, or you may select your desired audio quality as a fixed setting.
- Equalizer – only natively available in the fat client.
On Raspberry you can’t use the fat client – there is no ARM based version. For x86, Spotify offers an “inofficial”, best-effort maintained fat client, which works very well. Just follow the instructions for Debian given on their Spotify for Linux page.
Other DRM Content
Debian comes with Firefox ESR, and when you for the first time launch a page that requires DRM (like Spotify), a banner on top of Firefox will ask you if you want to activate DRM content. Do so, and that’s it. As I’m only occasionally using Netflix (and not currently), I cannot tell if this covers Netflix as well, but I assume so.
If not: There are ways to install the widivine-libraries – on Raspberry it was a package you could install via apt, but I seem to remember that this was not “official” Debian but came from the Raspberry Pi OS-fork. If I ever hit this point, I’ll update my post here.
I personally like Firefox – if you’re more the Chrome(ium) type, you need to figure things out yourself 🙂
Optional: Making Recordings Available via SMB Share
Not strictly media center related. However, I got used to it from the *ELEC distros, which usually exposed their file systems as SMB shares for anonymous users, some of them read only, some writeable. It allows to access the recordings from other computers in the network easy, or put media files from other computers on the media center’s hard drive. On my Raspberry Pi 4 I had an 2.5″ SSD drive attached via USB adaptor, and while the NUC OS resides on an M.2 SSD, I simply could insert the Raspberry SSD into the still free 2.5″ SATA slot. Software-wise these steps need to be done:
- Create permanent mount for the 2.5″ SSD
- Install Samba
- Configure Samba to publish the SSD
Creating Permanent Mount
First, we need to find out the UUID of the regarding partition. Do the following:
cd /dev/disk/by-uuid
ls -la
Now you need to understand which is your disk – in my case it was sdb2. Note down the UUID linked to it. Next step is to create the mount point in the file system. I chose it to be in the /mnt directory. Meaning I had to do the following:
cd /mnt
mkdir SSD
chmod 777 SSD
The mount point now allows full access from anyone. Last step is to setup the mount-at-boot of the SSD to the mount point. For this, you need to add a line to /etc/fstab:
UUID=<Your UUID> /mnt/SSD
After a reboot, you should have the drive available at /mnt/SSD.
Install and Configure samba
apt install samba
Edit /etc/samba/smb.conf – you need to do the following:
- Locate the line usershare allow guests and make sure it is set to yes.
- (Optional) Locate the section [homes] and comment out everything that is part of this section with “#”.
- Add a new section:
[SSD]
comment = SSD drive
path = /mnt/SSD
public = yes
writable = yes
guest ok = yes - Update the samba service to the new config with
service smbd reload
UI Scaling Adjustments and Other Mods for Better Access from a Distance
The number of blog posts I wrote regarding my media center may give the impression that I am a TV or movie aficionado – the contrary is true: I watch TV or movies infrequently. And this manifests in the fact that my screen is an old 23″ FullHD monitor that I saved from being trashed. When I watch TV, I sit about 2.5 m away from that screen, which obviously means that things need to be somewhat larger to be readable from that distance on such a small screen. I was surprised how different the window managers handle this scaling, but in general you have typically two options:
- Global scaling, sometimes called High-DPI scaling
This was a disappointment basically in any window manager, perhaps GNOME handling it best. The upscaled image was blurry, because the scaling was done by just increasing the pixel size, not by e.g. increasing fonts or drawing lines differently. - Font scaling
This “only” increases font size, but luckily all regarding UI elements scale along due to the increased space the texts need. Also images make use of the then increased real estate and scale up, but more intelligently. The result is a sharp image with larger elements, just what you want. Funny enough, as soon as you select a scale factor for the fonts, KDE recommends you to use global scaling instead…
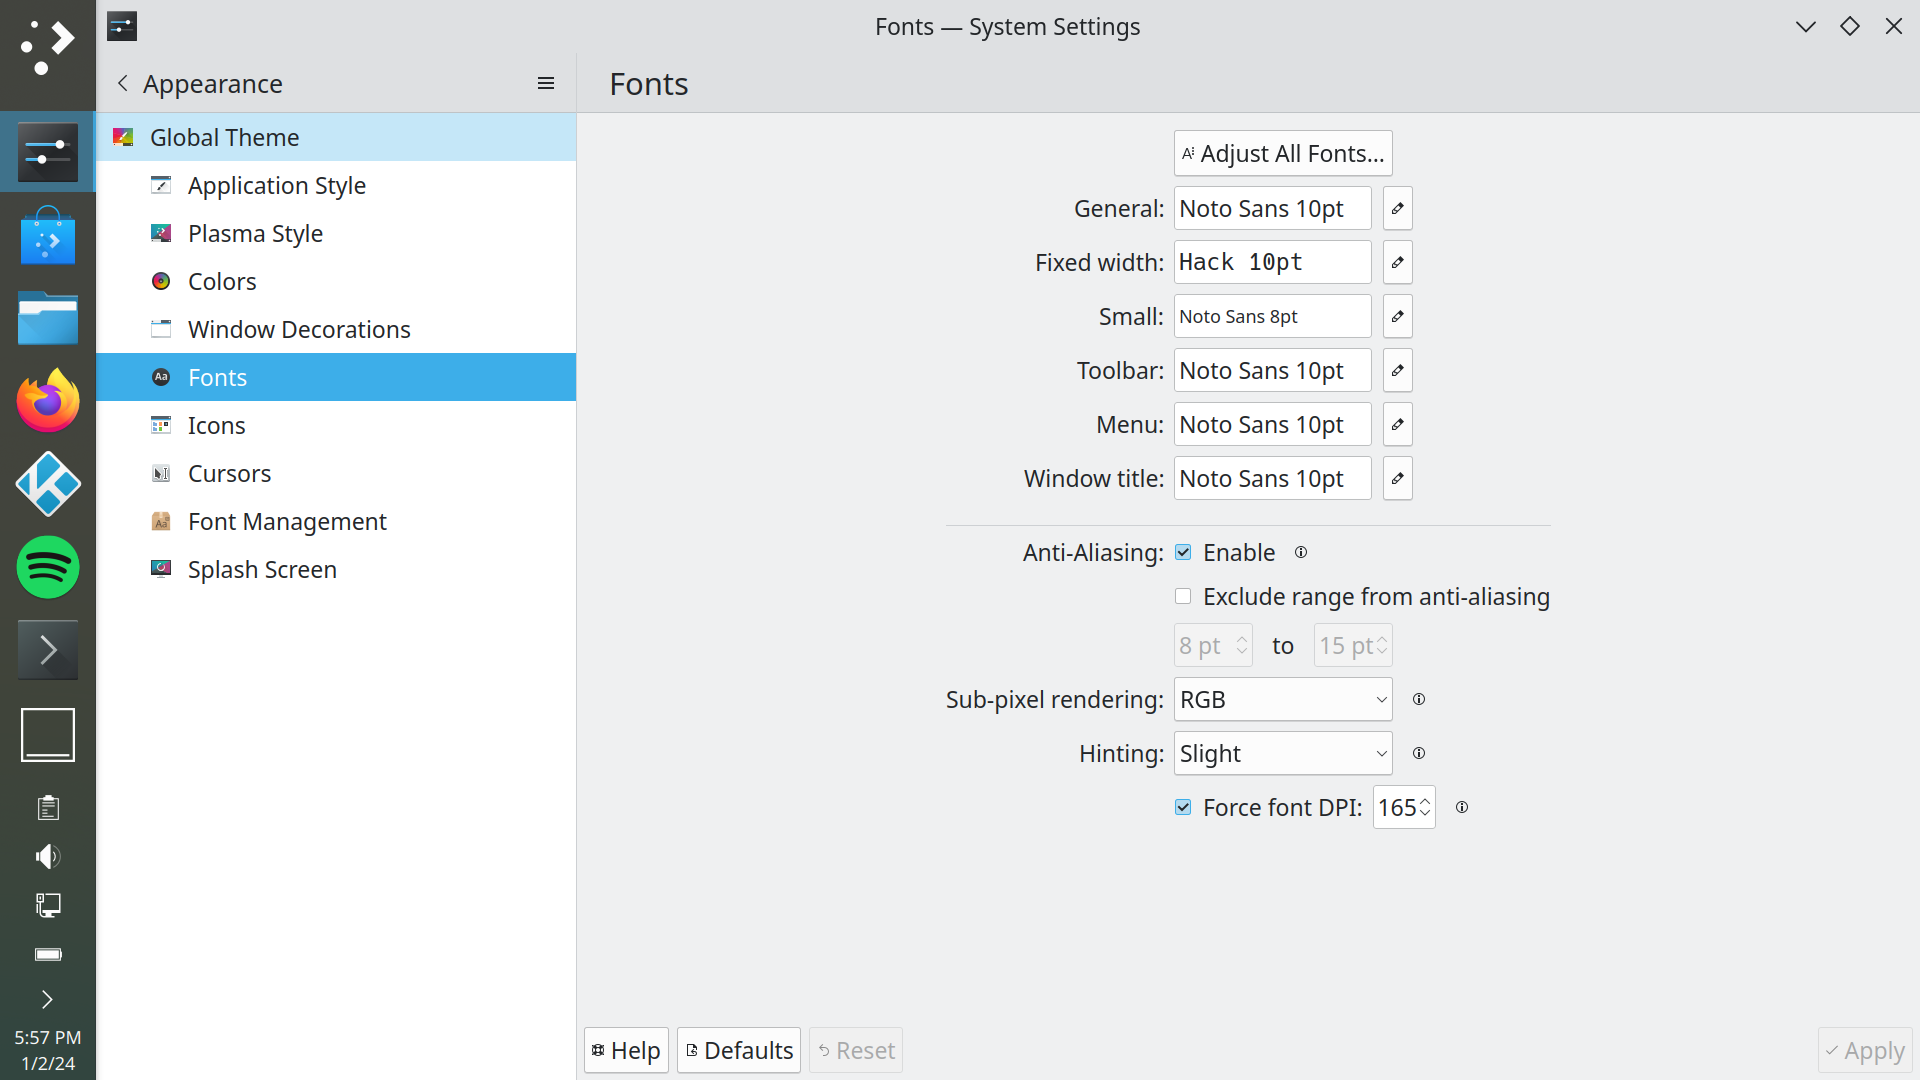
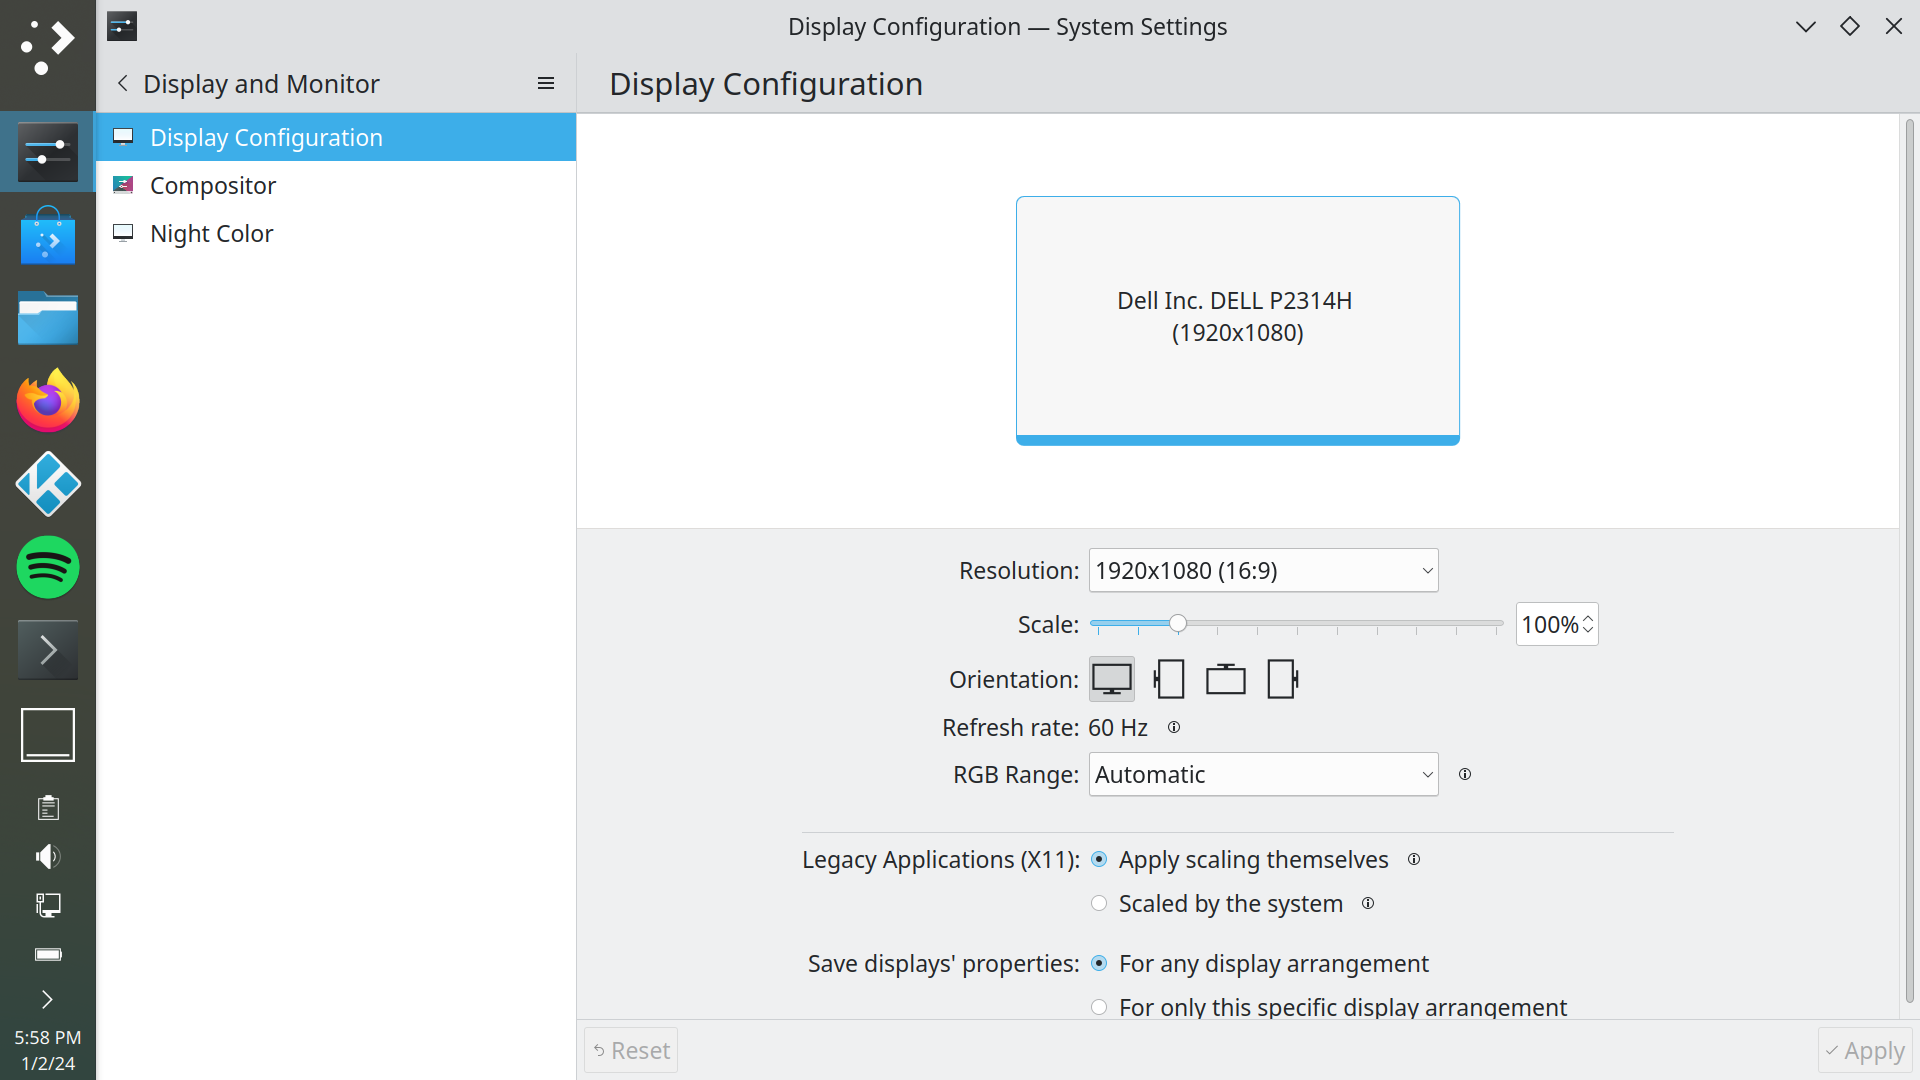
So, font scaling it is, and in order to find a good value, I used the Spotify app. This is a bit inflexible regarding scaling, and if you scale too much, important UI parts move out of the screen and can only be accessed via scrolling. The sweet spot was 165 DPI enforced font scaling on 1920 × 1080 screen resolution. The following screenshots may help you to locate the settings:
For Firefox this is basically OK, but I prefer to have everything even a bit larger, so I went into Firefox’ settings and set the default zoom factor to 133%.
The task bar/app launcher bar also needs a bit of attention: You can right click it and switch to edit mode. This allows you to move it to the left screen border, which makes more sense for a 16:9 aspect ratio monitor, rather than the default bottom position. Also, you can make it larger (I chose 96 pixels).
The rest is personal taste – which applications to pin to the bar, what to put on desktop (you can enlarge desktop symbols also with a right-click on the desktop) etc. – I’ll not dig into details.
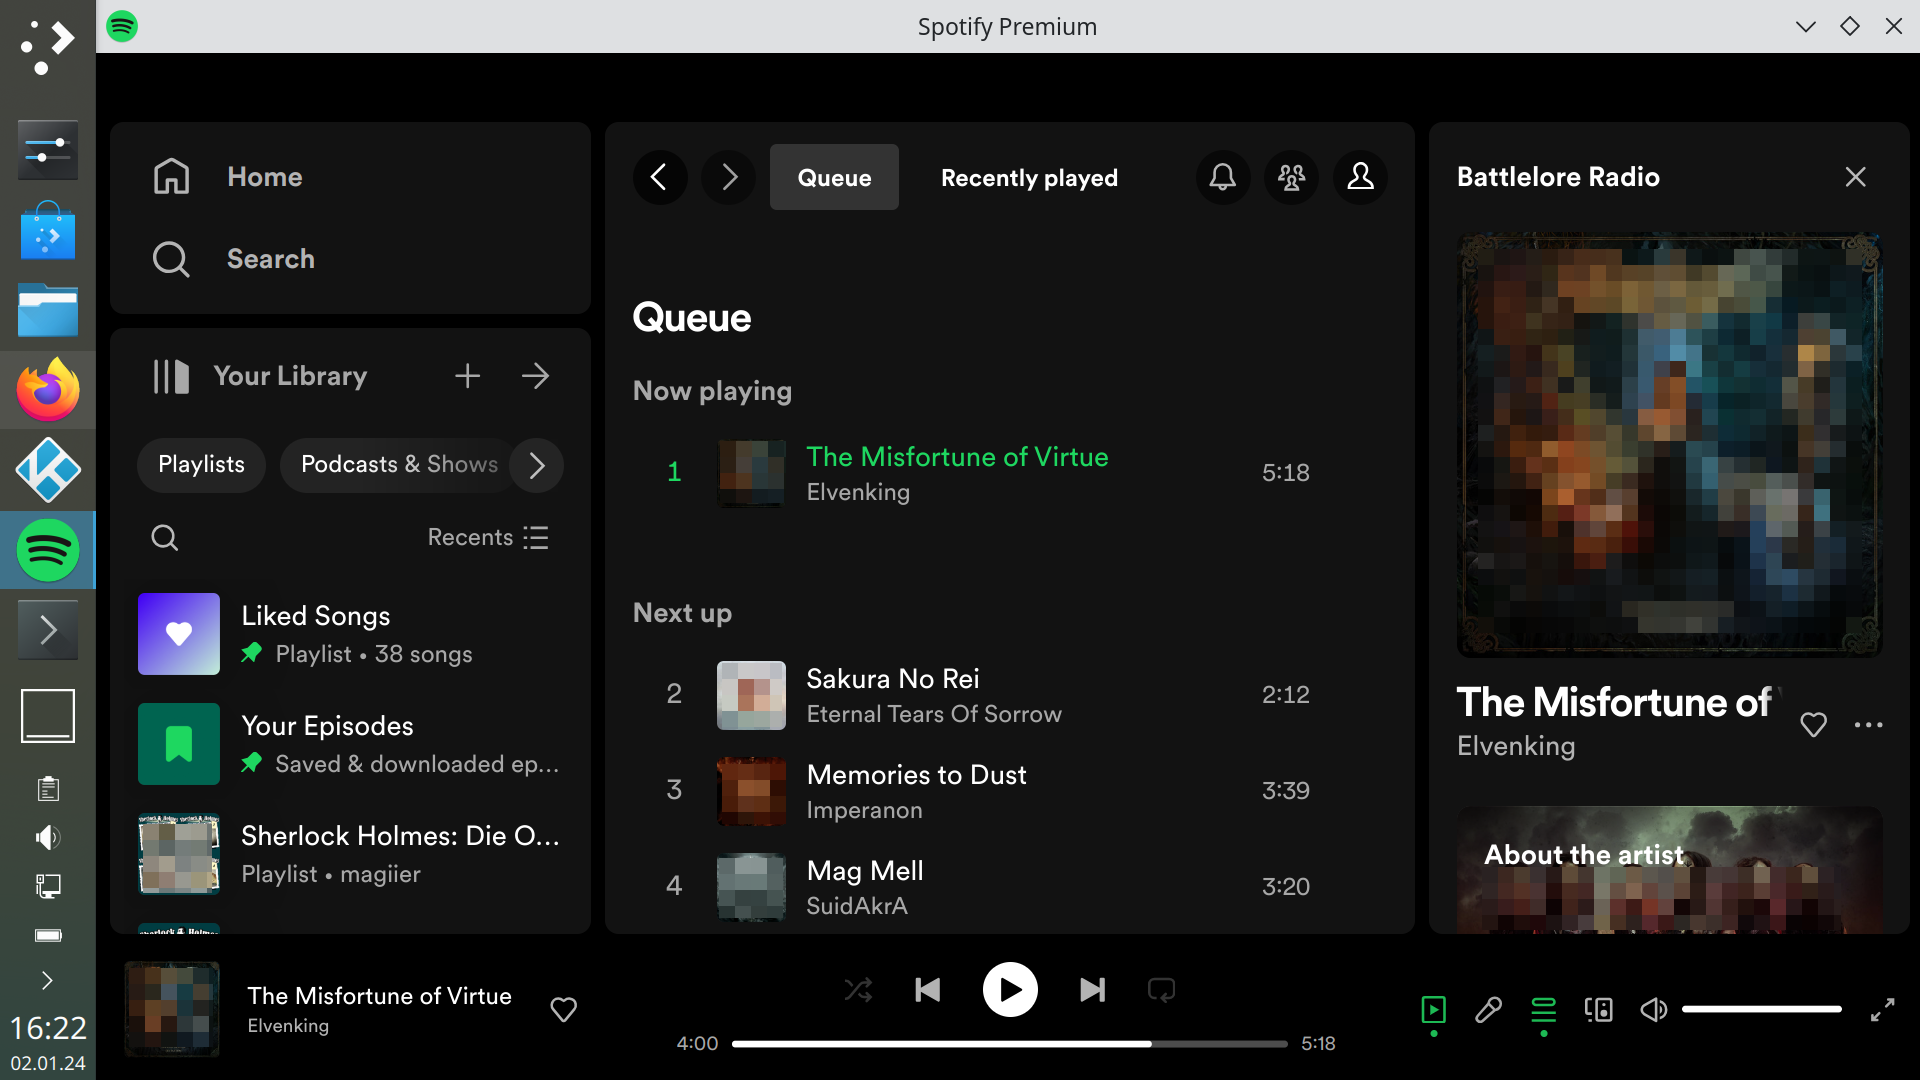
Here’s my final result with Spotify opened (I pixelated the album covers – not sure about copyright here…):
Final Words and Outlook
I am now very happy with my media center – pending any findings that will turn up on longer use. The setup is now only a few days old, so let’s see. My hope is that I’ll not need to change the hardware platform for my media center for several years – I already spent too much time with this topic.
However, I may spend I have spent some more time after all, for one topic: Sending the device to sleep when not used. Since I do recordings, currently the device needs to run 24/7. But with the power options of an x86 platform, I will now see how well I can send the device into deep sleep and wake it up when needed for a recording – this should save a lot of electricity. Will keep you posted… This works very well, and you can read all about it in my next blog post.