Building a Media Center for German IPTV
The Raspberry Pi with Kodi is a versatile media center. Getting it to work with German IPTV in a stable fashion is however somewhat challenging. In this post I outline the necessary steps to set up a XBian based media center, to make it usable on a rather small SD TV screen, to avoid the 30 minutes offset problem with the public German TV stations, to make the channel mappings stable and to control the media center via IR remote control.
As usual, the article starts with lots of blah blah – you may skip this an directly read about
- Basic XBian setup steps
- Configure Kodi for a small SD screen
- Set up IPTV channels in tvheadend
- Solve the 30 minutes offset problem
- Getting service-to-channel assignments stable
- Use an IR remote control
There are some dependencies in the text – maybe you’ll need to scroll back if you jump in late and want to understand everything.
Remark: This is a somewhat outdated post – this one is more up to date!
Preface
Germany switched off DVB-T on March 27th 2017, replacing it with DVB-T2 – German style. I.e. HD with H.265/HEVC codec, and: the privatly owned TV stations encrypted. To watch them, you’d need to pay about 70,- € per year to “freenet”. Ridiculous! Why would I pay money to see commercial-infested linear TV? For about the same price that Netflix, Amazon Prime and the rest charge for commercial-free, self-directed TV? No way! And: DVB-T was introduced in Germany only about 10 years ago – and now millions of devices can be thrown away. Long story short: I decided to not longer support this nonsense ad looked how far I can get with a Media Center and IPTV live streams from the public TV stations.
Choosing the media center
Hardware base
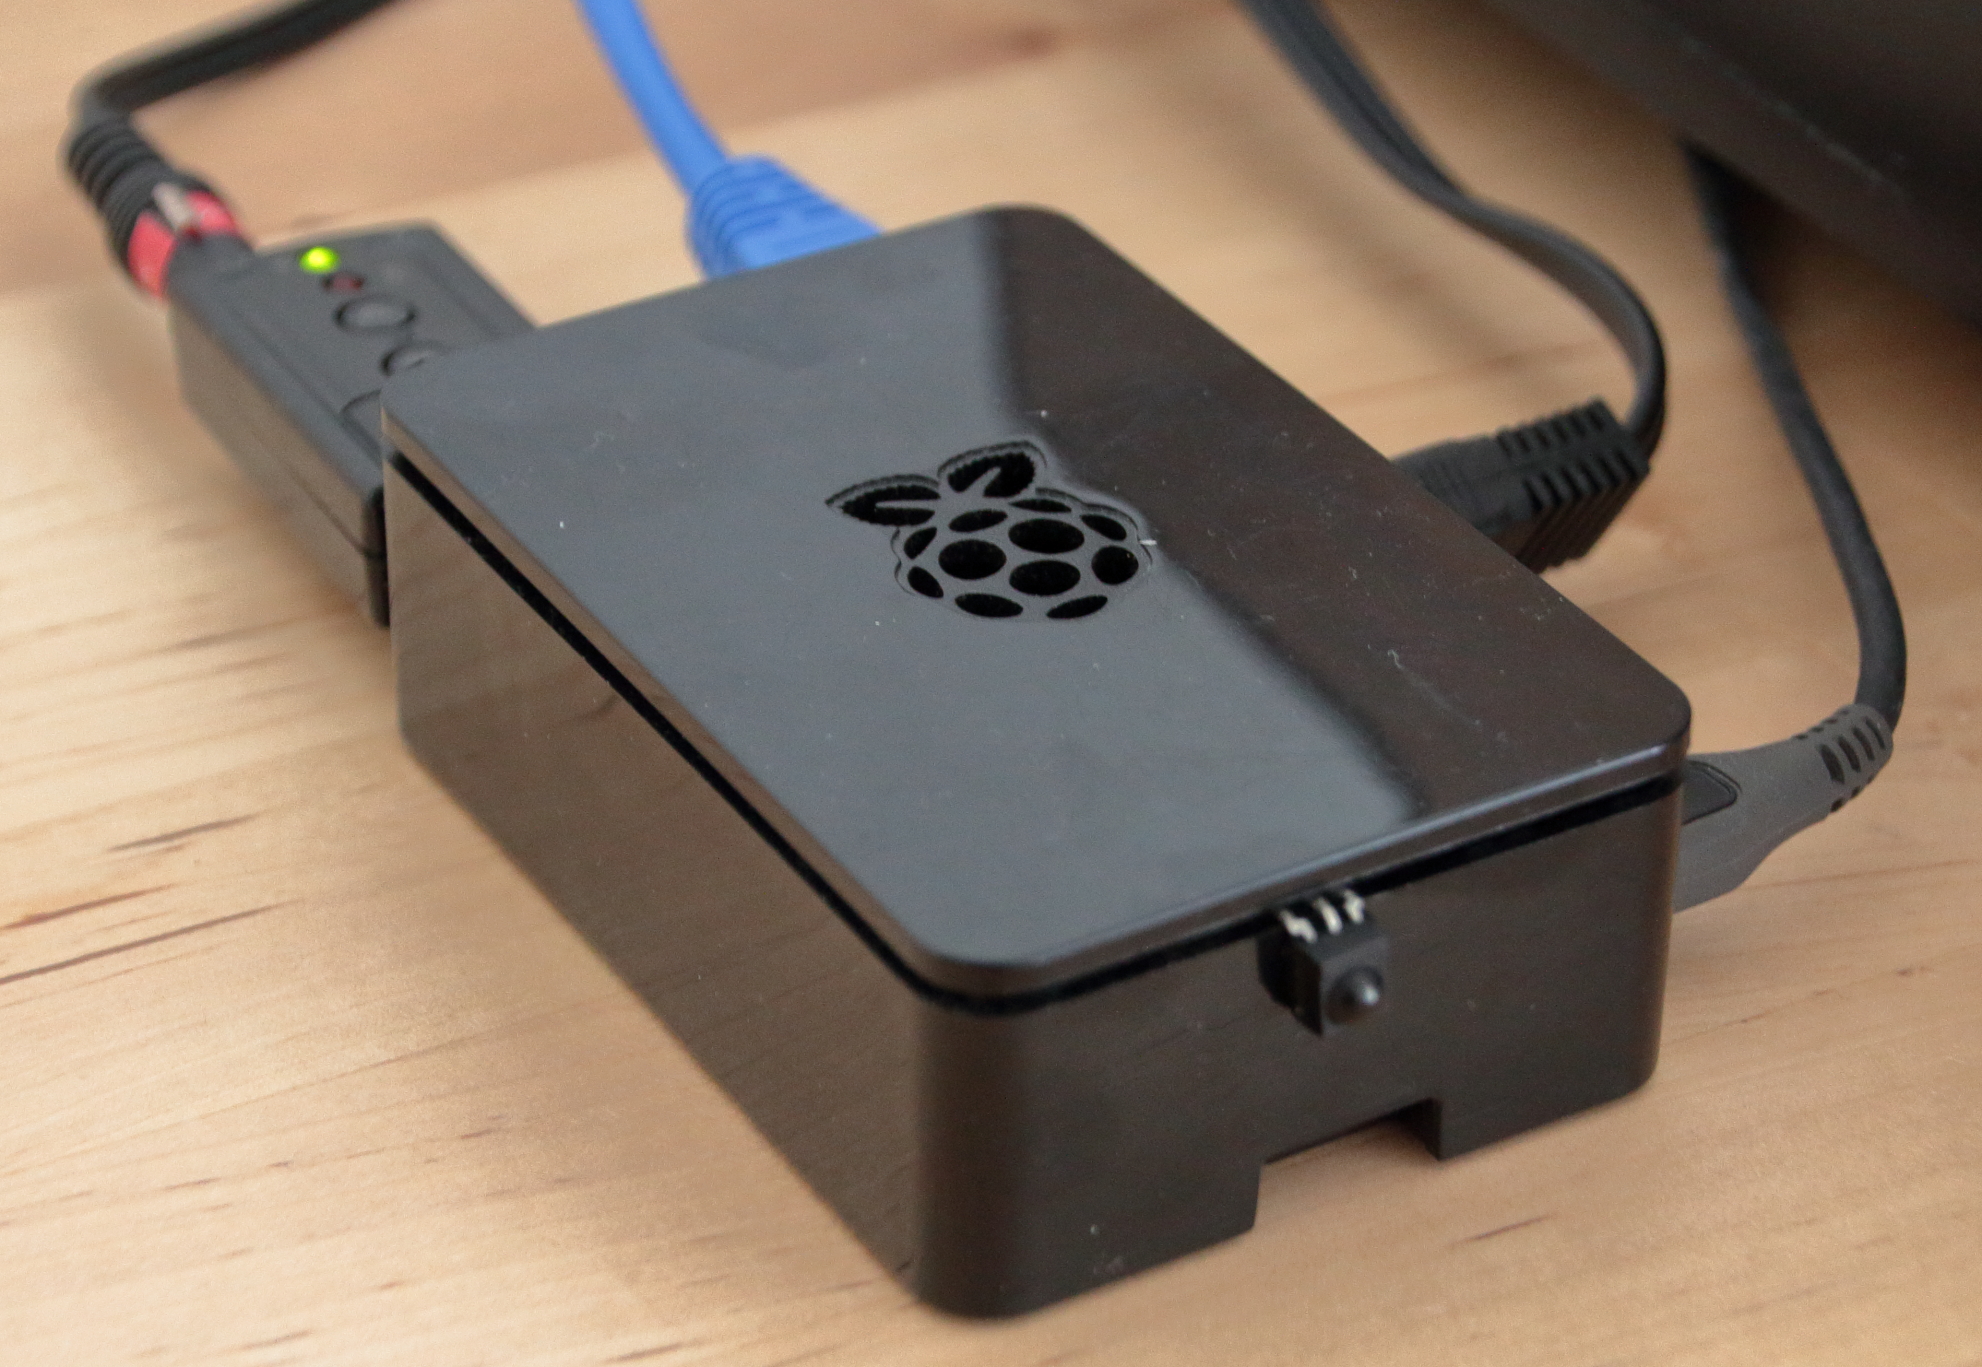
One thing was more or less clear from the beginning: I’d want to use a Raspberry Pi. Why? First: I already have it. Second: Low power consumption. Third: It’s cheap. Fourth: It’s currently well suited for the task, having MPEG-2 and H.264 hardware decoding on board. Fifth: If it at some point is no longer the right hardware, I have other use for it – unlike my now old DVB-T receiver, which I can perhaps use the power supply of, but else can only trash or harvest for parts.
Heard a lot positive about Windows 7 Media center, but having a full fledged PC in my living room just for TV? No…
However, there are disadvantages, but for the time being I can ignore them: H.265/HEVC is on the doorstep – it is only a question of time until the Raspberry Pi will not be the ideal device anymore, unless the Raspberry Foundation comes up with something new. And: It is not easy to put into standby for really low power consumption – but this may be altered using a real time clock. Will investigate this if the media center has survived the first two or three months and proven its usefulness.
Software
Having Raspberry Pi as hardware base, I could only find one kind of media center for it: Kodi. But this exsits in several flavours: As native Raspbian package, OpenELEC, LibreELEC, OSMC and XBian. Which is the best? I tried them all (except for the native package), and honestly: I could hardly find any difference. Not sure why they exist in parallel… In the end I settled for XBian for two reasons: First, it’s a rolling distribution, no need to at some point restart from scratch, and second: It had the newest tvheadend package built in – and as it turned out (details follow below) this was crucial to get IPTV running.
Setting up XBian
There are zillions of tutorials how to do that – a very exhaustive German blog post series is written by Helmut Krager (2015 – not everything written there is still completely true), but in principle the XBian getting started page is enough to get it up and running. On Unknown Blog you find explanations to get the SD card ready for Windows, MAC and Linux – if you struggle at that point, look at this page.
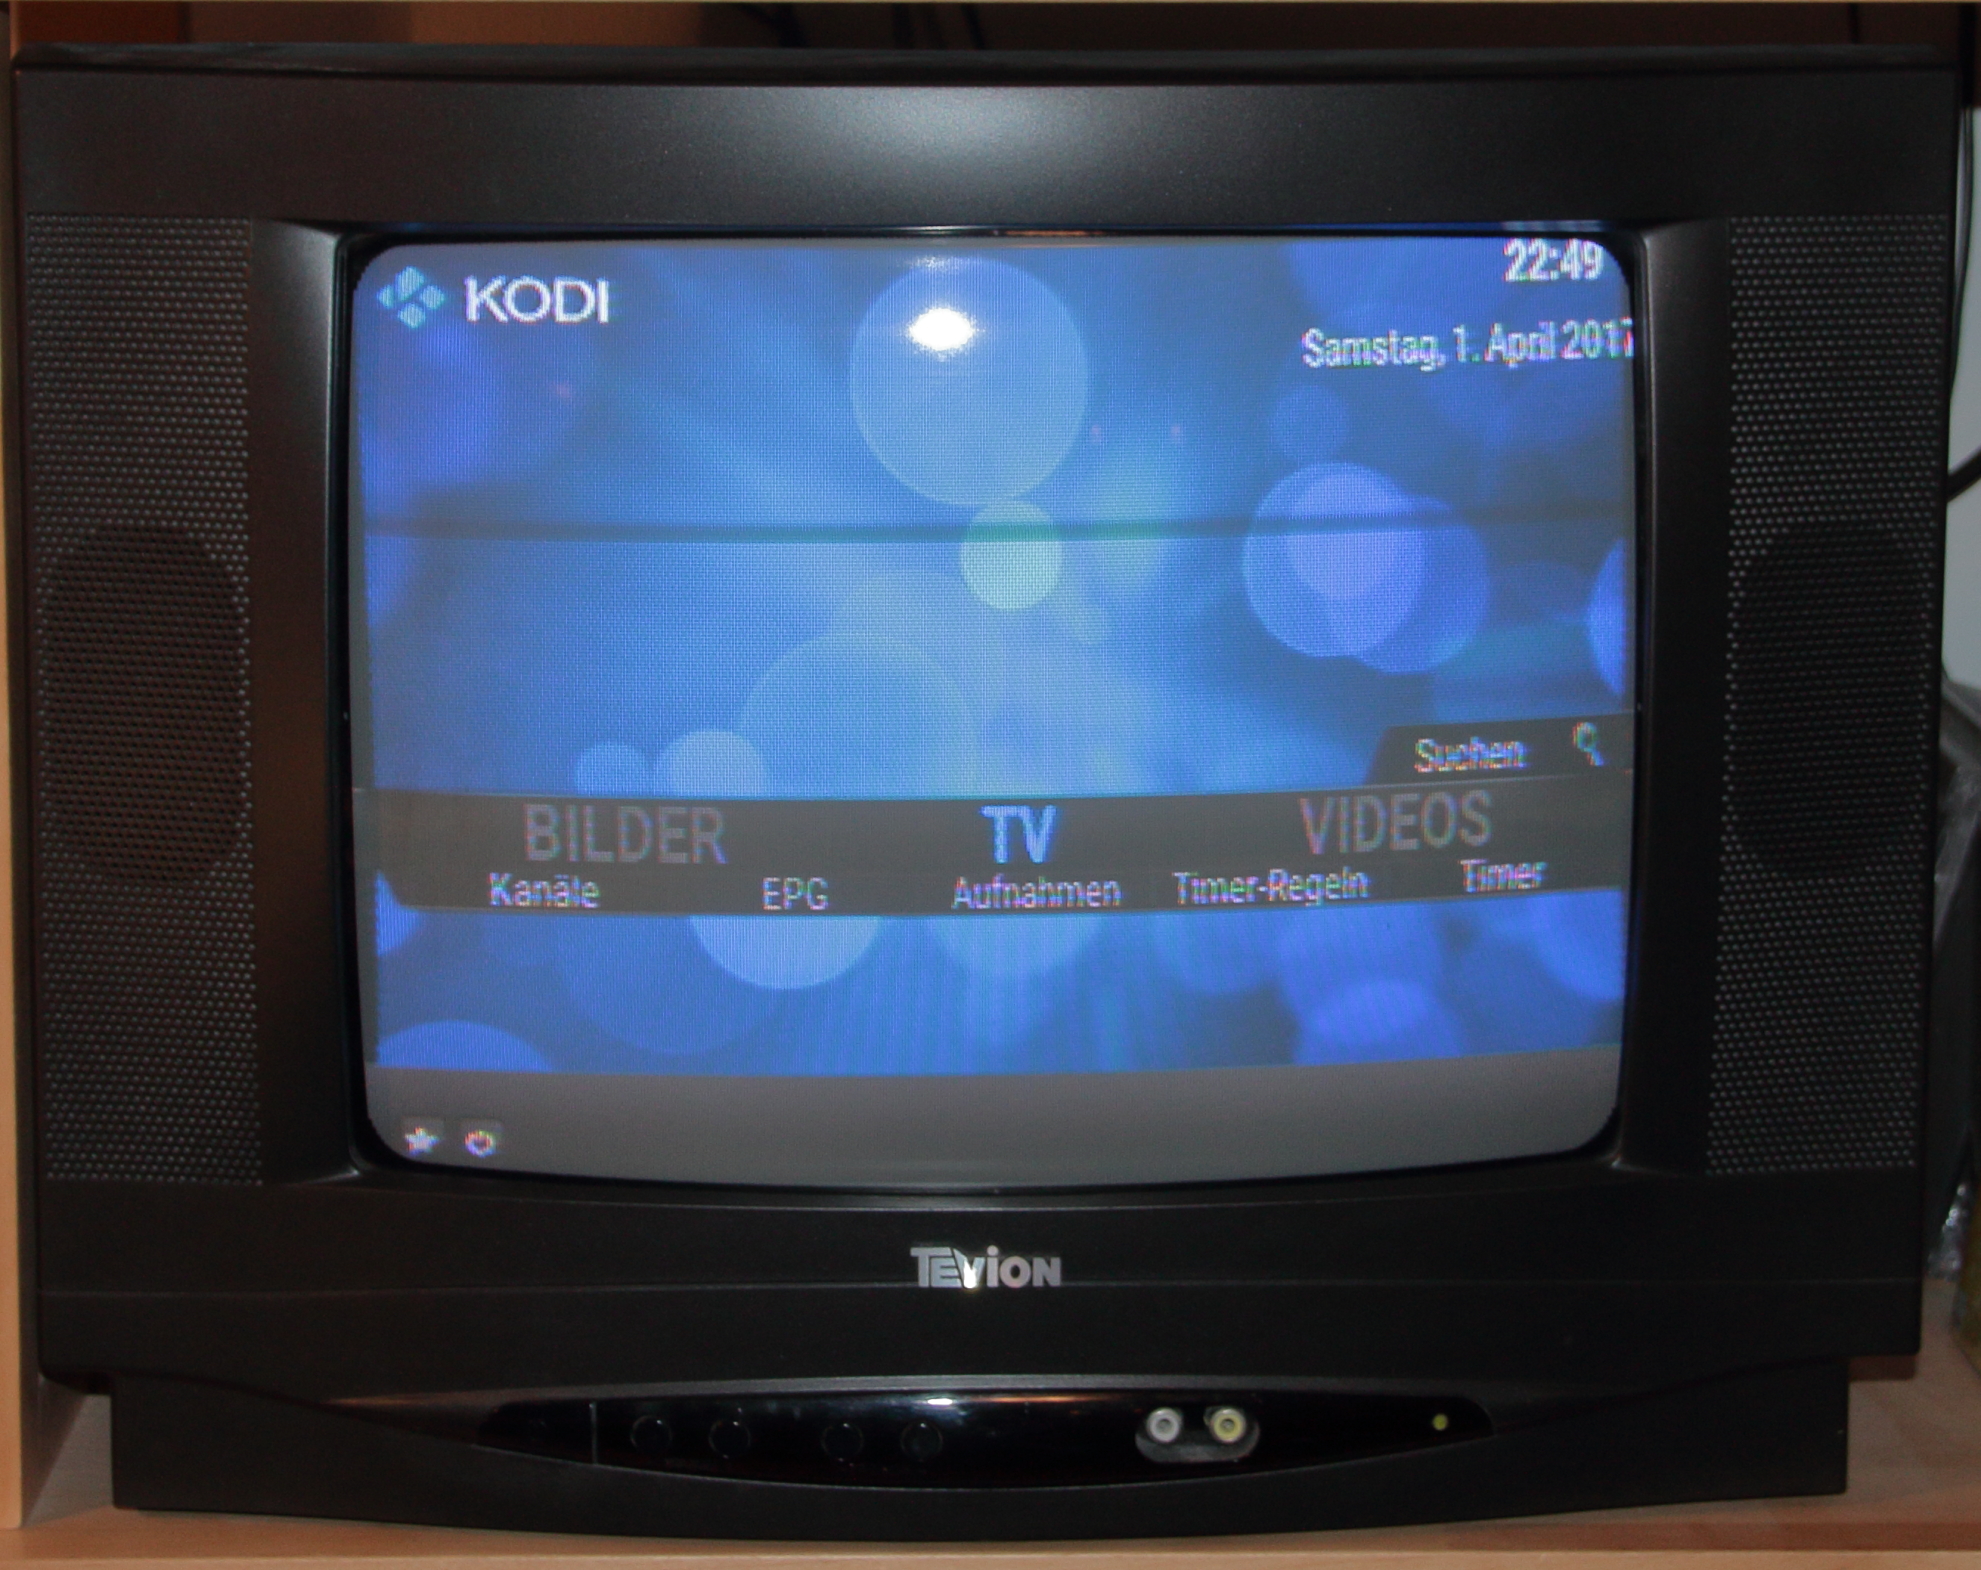
Challenge: My rather small SD TV set!
While things are rather boring up to here, challenges start at my TV set. It is an old CRT device with an effective screen diogonal of 36 cm – thats 14 inches. SD resolution of course. At this point you may realize that watching TV is not our favorite pastime 🙂
Connecting it
That’s the easy part: Since the Raspberry Pi shoots out composite video, and the CRT, old as it may be, still has a SCART connector, this works. I had lying around a SCART to RCA/Cinch adapter, and I bought a tip-ring-ring-sleeve jack to cinch adapter. Works like a charm – just be aware that these adapters come in different pin configurations. This page perfectly explains the details.
Configuring the Raspberry Pi
Besides the basic stuff like setting a hostname and changing the default password, the composite video signal needs setup for German PAL TV norm by modifying /boot/config.txt:
|
1 2 |
sdtv_mode=2 sdtv_aspect=1 |
This sets PAL and 4:3 aspect ratio. And thats it.
Finding an appropriate theme for Kodi
I tried them all. I think about 20 themes come along with XBian, all claiming to offer a sleek, versatile, clean UI. None is uasble at SD resolution on a small screen. You can’t read the text, unless you sit directly in front of the screen, and the fonts you may choose from don’t help. Fortunaltely, after quite an odyssey, I stumbled across someone who had the same problem and published the Confluence 480 theme as a modification of the original Confluence theme. And here is how you set it up (needs the command line/SSH as user xbian):
|
1 2 3 4 5 6 |
git clone https://github.com/YggdrasiI/skin.confluence.480.git cd skin.confluence.480 python ./templates/config.py python ./buildPackage.py cd /dev/shm mv ./skin.confluence.480 /home/xbian/.kodi/addons |
If the first command fails, you may not have git toolset installed. Just do
|
1 |
sudo apt-get install git |
Restart Kodi and select the theme as usual. I also changed the font to large font. Don’t forget to do the video calibration and adjust the theme zoom.
Now it’s well readable on my TV – yay!
Setting all up for German public IPTV
While getting XBian up and running is a piece of cake, getting German IPTV stations up and running in a stable fashion turned out to be quite difficult. I was rather surprised that nobody yet has done it and written about it somewhere.
Goal
Being used to some features from my old DVB-T receiver, I wanted to have:
- Timeshift
- Recording capabilities
- Watch a TV station while another is recorded (had a twin tuner before)
- Watch a still running recording
- Use an IR remote control
Not good: IPTV simple client
99% of all howto’s on the net tell you: Watch IPTV with IPTV simple client. While it is true that this works very well, it does not offer any of my required features. Not happy…
From playing around with tvheadend (years ago when the first Raspberry Pi came out and I wanted to attach my DVB-T USB card to it), I knew that tvheadend – although not being very intuitive to set up – offers what I needed. So let’s…
Install tvheadend Server
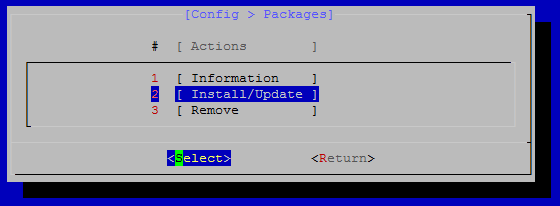
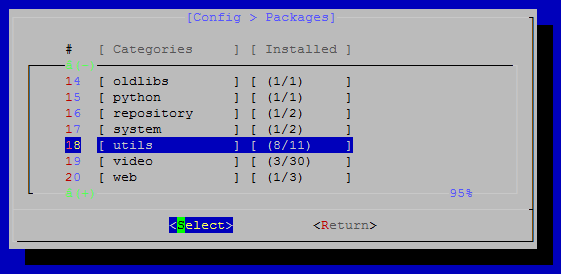
I’m a friend of using built-in packages when offered – so to install tvheadend use XBian’s built-in setup tool that starts up when you log in via commandline/SSH:
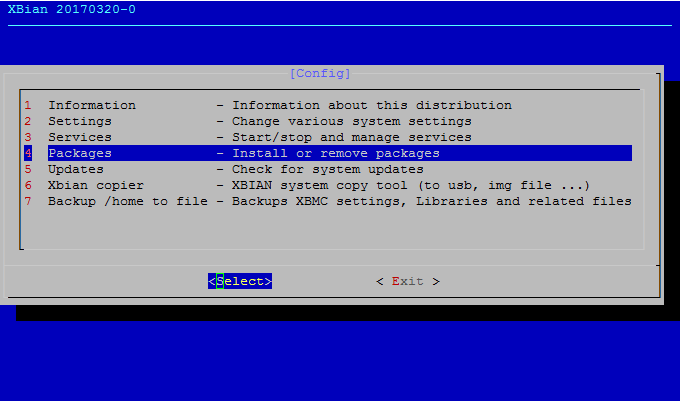
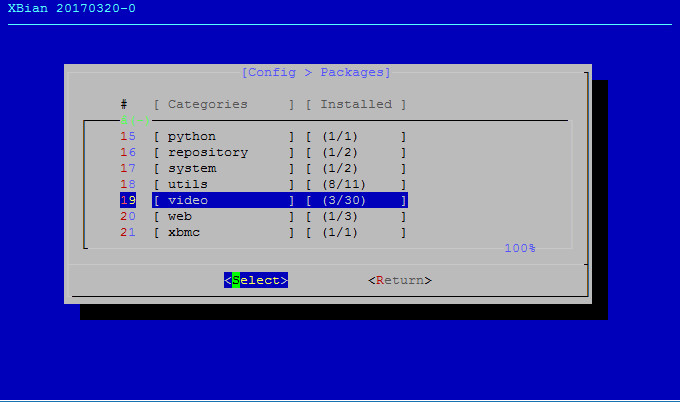
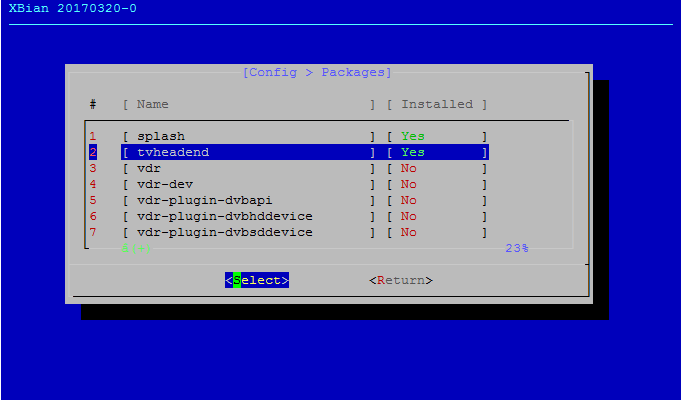
Then choose “Install/Update” (Since I did already, it says “Yes” in the screenshot above):
tvheadend Client/Frontend
To use tvheadend in Kodi, you need to install the add-on “Tvheadend HTSP Client”. Just do it the standard way, and activate it. The default configuration should be OK.
This add-on already covers all my requirements from above by being a PVR add-on to Kodi. The Kodi built-in features for recording, timeshift etc. will work out of the box as soon as the TV channels are set up.
Setting up TV channels
German IPTV uses HTS streams. There is a good documentation how HTS works on the net from Apple. The basic procedure to use HTS in tvheadend is relatively simple, but has it’s pitfalls:
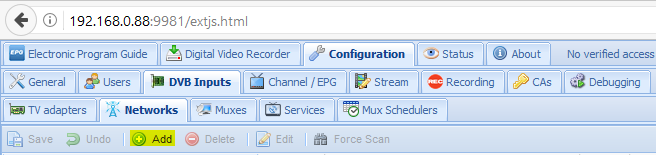
- Open tvheadend web interface with any browser using
http://<IP of your Raspberry Pi>:9981/ - Go to Configuration – DVB Inputs – Networks
- Find out the live stream m3u8 playlist of each TV station – e.g. here. Looks like something like this:
http://daserste_live-lh.akamaihd.net/i/daserste_de@91204/master.m3u8 - Choose the “+ Add” button
- Choose IPTV Automatic Network
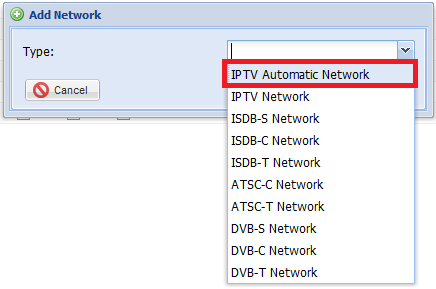
- Choose a name and paste the URL of the m3u8 playlist
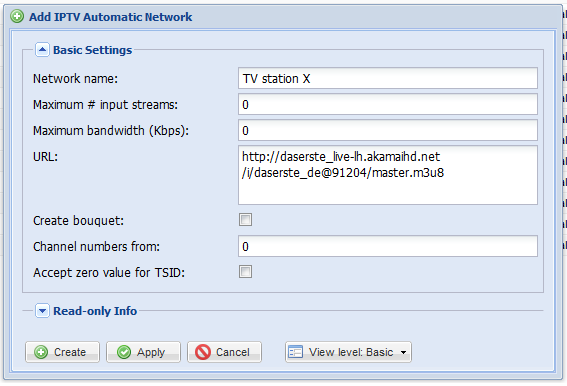
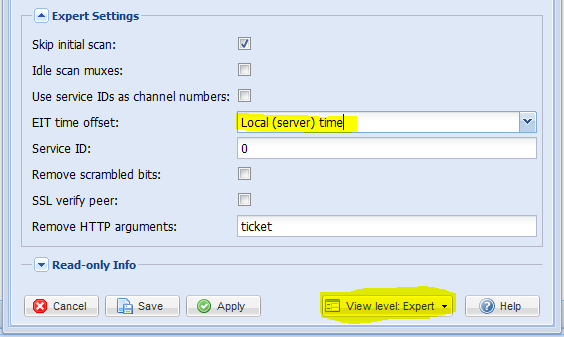
- Switch “View level” to “Expert” and change the EIT time offset to “Local (server) time” – only then your timed recordings will be correct. Be sure to also set Kodi/Raspberry/tvheadend to the correct timezone!
- Click “Create”.
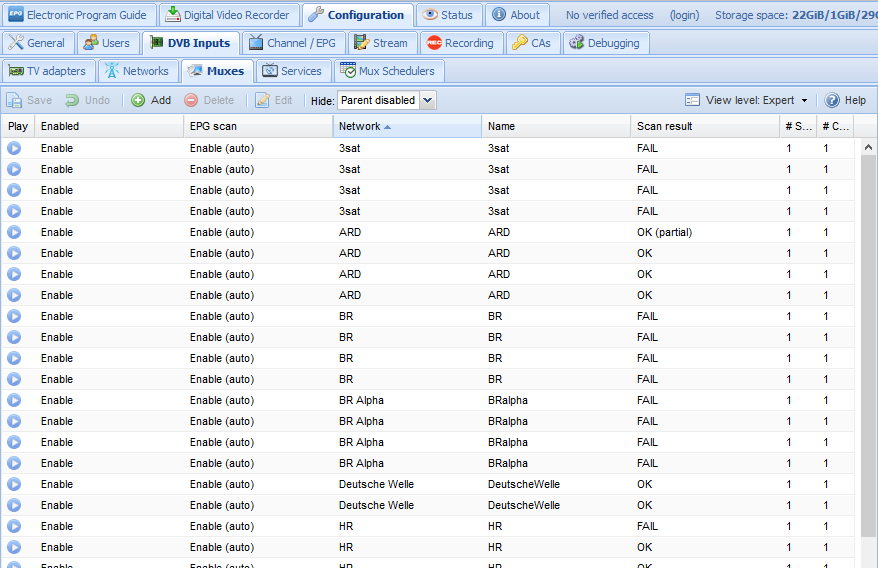
What will happen now is that tvheadend will scan the playlist and detects the actual streams (most TV stations offer more than one stream: different resolutions, and sometimes only the audio track). For each stream a “Mux” will be created. Each Mux (i.e. stream) will then be checked if it actually delivers data. If so, a “Service” is created for each active stream. The result is shown in the networks overview:
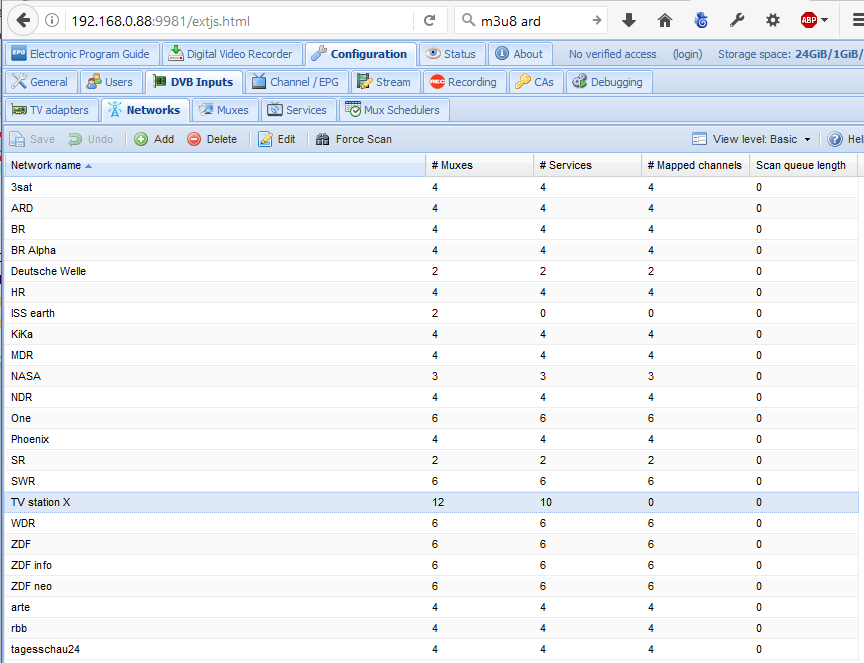
Our example network has 12 Muxes, but only 10 deliver data and are now Services.
Unfortunately, things get a little bit cumbersome from here on – but I’ll show solutions later that avoid the complexity of the next steps. But just to be complete, here’s how it goes on in principle:
- On the “Services” tab you’ll see all the services created:
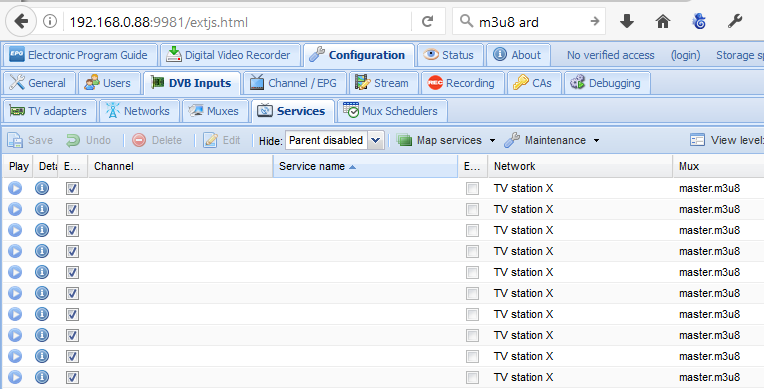
You see that they are indistiguishable from each other. You can check which is what by clicking on the “Play” symbol to the left. After a few seconds, you should see the stream in a media player (if this is supported by your OS/Computer/setup). You’ll see that some are low resolution, and some are higher resolutions. Also some in my case did not work at all.
A perhaps faster way to identify your services is to download the original IPTV playlist into a text editor. It will look like this:
|
1 2 3 4 5 6 7 8 9 10 11 12 13 14 15 16 17 18 19 20 21 22 23 24 25 |
#EXTM3U #EXT-X-STREAM-INF:PROGRAM-ID=1,BANDWIDTH=184000,RESOLUTION=320x180,CODECS="avc1.66.30, mp4a.40.2" http://daserste_live-lh.akamaihd.net/i/daserste_de@91204/index_184_av-p.m3u8?sd=10&rebase=on #EXT-X-STREAM-INF:PROGRAM-ID=1,BANDWIDTH=184000,RESOLUTION=320x180,CODECS="avc1.66.30, mp4a.40.2" http://daserste_live-lh.akamaihd.net/i/daserste_de@91204/index_184_av-b.m3u8?sd=10&rebase=on #EXT-X-STREAM-INF:PROGRAM-ID=1,BANDWIDTH=320000,RESOLUTION=480x270,CODECS="avc1.66.30, mp4a.40.2" http://daserste_live-lh.akamaihd.net/i/daserste_de@91204/index_320_av-p.m3u8?sd=10&rebase=on #EXT-X-STREAM-INF:PROGRAM-ID=1,BANDWIDTH=320000,RESOLUTION=480x270,CODECS="avc1.66.30, mp4a.40.2" http://daserste_live-lh.akamaihd.net/i/daserste_de@91204/index_320_av-b.m3u8?sd=10&rebase=on #EXT-X-STREAM-INF:PROGRAM-ID=1,BANDWIDTH=608000,RESOLUTION=512x288,CODECS="avc1.77.30, mp4a.40.2" http://daserste_live-lh.akamaihd.net/i/daserste_de@91204/index_608_av-p.m3u8?sd=10&rebase=on #EXT-X-STREAM-INF:PROGRAM-ID=1,BANDWIDTH=608000,RESOLUTION=512x288,CODECS="avc1.77.30, mp4a.40.2" http://daserste_live-lh.akamaihd.net/i/daserste_de@91204/index_608_av-b.m3u8?sd=10&rebase=on #EXT-X-STREAM-INF:PROGRAM-ID=1,BANDWIDTH=1216000,RESOLUTION=640x360,CODECS="avc1.77.30, mp4a.40.2" http://daserste_live-lh.akamaihd.net/i/daserste_de@91204/index_1216_av-p.m3u8?sd=10&rebase=on #EXT-X-STREAM-INF:PROGRAM-ID=1,BANDWIDTH=1216000,RESOLUTION=640x360,CODECS="avc1.77.30, mp4a.40.2" http://daserste_live-lh.akamaihd.net/i/daserste_de@91204/index_1216_av-b.m3u8?sd=10&rebase=on #EXT-X-STREAM-INF:PROGRAM-ID=1,BANDWIDTH=1992000,RESOLUTION=960x540,CODECS="avc1.77.30, mp4a.40.2" http://daserste_live-lh.akamaihd.net/i/daserste_de@91204/index_1992_av-p.m3u8?sd=10&rebase=on #EXT-X-STREAM-INF:PROGRAM-ID=1,BANDWIDTH=1992000,RESOLUTION=960x540,CODECS="avc1.77.30, mp4a.40.2" http://daserste_live-lh.akamaihd.net/i/daserste_de@91204/index_1992_av-b.m3u8?sd=10&rebase=on #EXT-X-STREAM-INF:PROGRAM-ID=1,BANDWIDTH=2691000,RESOLUTION=960x540,CODECS="avc1.77.30, mp4a.40.2" http://daserste_live-lh.akamaihd.net/i/daserste_de@91204/index_2692_av-p.m3u8?sd=10&rebase=on #EXT-X-STREAM-INF:PROGRAM-ID=1,BANDWIDTH=2691000,RESOLUTION=960x540,CODECS="avc1.77.30, mp4a.40.2" http://daserste_live-lh.akamaihd.net/i/daserste_de@91204/index_2692_av-b.m3u8?sd=10&rebase=on |
You’ll notice that each stream is defined by a line starting with #EXT-X-STREAM-INF:, and another line stating an URL. The first line also states a resolution. This is a mandatory field, so you’ll always find it in the regarding playlists. It makes it easy for you to identify the streams of the desired quality.
You may be tempted to always pick the largest resolution available, but keep in mind a few things:
- Larger resolution requires more internet bandwidth
- Larger resolution results in larger recording files
So choose wisely 🙂
Now go to the “Muxes” tab and open a Mux (use “Edit”):
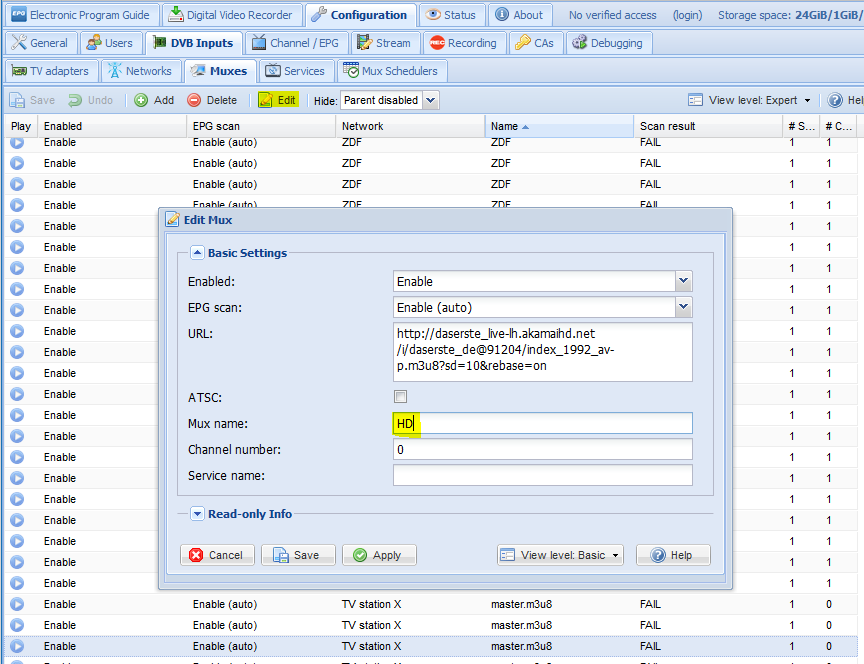
Now you can compare the URL of the mux, which tvheadend picked from the playlist, to the downloaded playlist. For services that match your criteria, you change the Mux name to something that helps you to identify it on the services tab for the next step.
- Map services to an actual TV channel. For this select one or more services and pick “Map selected services”:
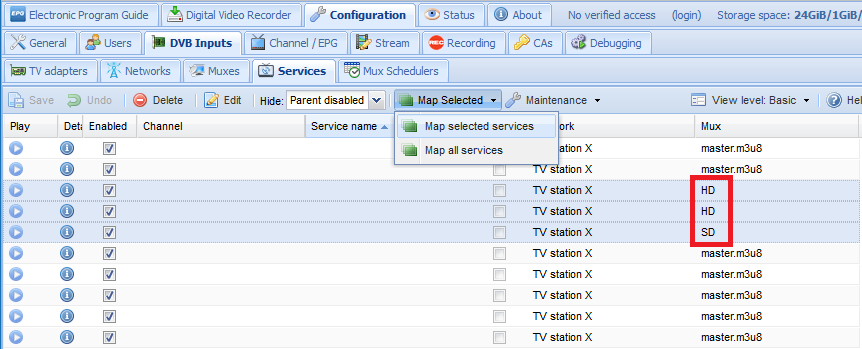
As you see, the Mux naming now helps you to identify the services in question. Leave the next dialog at default values:
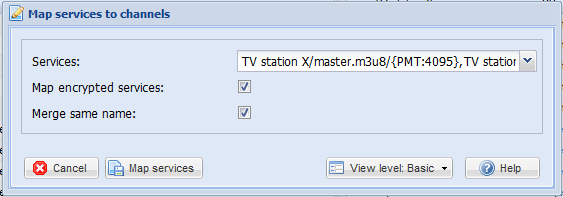
After clicking “Map services” the service mapper kicks in and will show you the result:

You’ll sometimes have services that are “ignored” – that’s usually OK, since they don’t deliver valid data.
- Rename your channel and optionally assign a channel number:
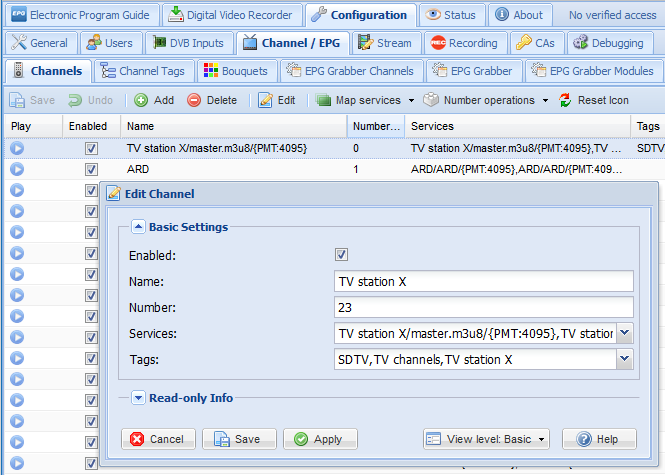
The automatically generated station name is not very cool, so rename it. Assigning a channel number is a good idea, since Kodi can use these numbers. I found this to be more stable than using the channel sorting and numbering from Kodi itself.
The tvheadend HTS client/Kodi will now pick up the channels and you can watch them, record them etc.
I tried recording three channels at the same time and watched a fourth – was no problem at all!
This is not stable…
While this in principle works, I had several problems:
- The problem of finding the right resolution as described above – works, but is tedious work
- The service-to-channel-assignments vanished after a while – some were gone after a day, some after two or three. A few stayed forever. Which in turn meant that the tedious work would start from scratch…
- The public German IPTV channels all offer 30 minutes timeshift in their online player. As a result, the stream playlist covers 30 minutes of material. The tvheadend HTS client always starts at the top of the playlist – so you lag behind live TV by 30 minutes!
Leaving it as this, the media center would be worthless for me. But I found a…
Stable Solution
Overview
I created PHP scripts that run on the Raspberry Pi on a web server which filter and shorten the m3u8 playlists. To avoid losing the service-channel associations, I stored the TV station playlists for the networks locally.
In detail
Setting up the web server (may not be necessary)
I overlooked that XBian already has Apache2 on board, so I installed lighttp as well. It should be possible to do the same thing with Apache – even the config should be similar. However, here’s my way:
Install lighttp and PHP:
|
1 |
sudo apt-get install lighttpd php5-cgi |
Now configure the webserver – I chose to use port 8000 for my scripts, just not to interfere with standard port 80 for web services. You need to edit /etc/lighttpd/lighttpd.conf (same lines should work with Apache):
|
1 2 3 4 5 6 7 |
[...] server.port = 8000 [...] fastcgi.server += ( ".php" => (( "bin-path" => "/usr/bin/php-cgi", "socket" => "/var/run/lighttpd/php.sock" ))) |
([…] means lines that are inbetween are unmodified)
Version 1 (recommended): Filter by resolution and shorten stream playlist
As defined in the HTS specification, the stream playlist (which tvheadend imports as a Mux) is a rolling playlist that contains a number of short (typically 10s) stream fragments, the sequences. While the stream runs, new sequences are appended to the playlist, while older drop out. A snapshot of such a playlist may look like this (shortened):
|
1 2 3 4 5 6 7 8 9 10 11 12 13 14 15 16 |
#EXTM3U #EXT-X-TARGETDURATION:10 #EXT-X-ALLOW-CACHE:YES #EXT-X-VERSION:3 #EXT-X-MEDIA-SEQUENCE:148753965 #EXTINF:10.000, http://daserste_live-lh.akamaihd.net/i/daserste_de@91204/segment148753965_184_av-b.ts?sd=10&rebase=on #EXTINF:10.000, http://daserste_live-lh.akamaihd.net/i/daserste_de@91204/segment148753966_184_av-b.ts?sd=10&rebase=on #EXTINF:10.000, http://daserste_live-lh.akamaihd.net/i/daserste_de@91204/segment148753967_184_av-b.ts?sd=10&rebase=on [...] #EXTINF:10.000, http://daserste_live-lh.akamaihd.net/i/daserste_de@91204/segment148754141_184_av-b.ts?sd=10&rebase=on #EXTINF:10.000, http://daserste_live-lh.akamaihd.net/i/daserste_de@91204/segment148754142_184_av-b.ts?sd=10&rebase=on |
As said earlier, German public IPTV contains 180 10s-sequences, adding up to 30 minutes of streaming material. In order to have really live-TV, this playlist needs to be shortened. I currently keep only the last 6 sequences, i.e. one minute of material in my playlists, and this seems to work reasonably stable (but may need fine tuning).
The shortening is done by /var/www/html/m3u8shorten.php:
|
1 2 3 4 5 6 7 8 9 10 11 12 13 14 15 16 17 18 19 20 21 22 23 24 25 26 27 28 29 30 31 32 33 34 35 36 37 38 39 40 41 42 43 44 45 46 47 48 49 50 51 52 53 54 55 56 57 58 59 60 61 62 63 64 65 66 |
<?php /* This script takes a m3u8 playlist that contains a sequence of transport streams. It drops all sequence URLs but the last ones - how many can be configured via GET variable. It adjusts the starting sequence number accordingly. Input GET variables: Keep Number of sequences to keep TargetURL URL of the original playlist ServiceName Name of the TV service - is added to the playlist as #EXT-X-MEDIA:NAME= (currently ignored by tvheadend) Written by Hauke April 2017 */ // Set correct content type for playlist header('Content-Type: application/x-mpegURL'); // Read GET variables $M3u8URL = $_GET['TargetURL']; $SequencesToKeep = $_GET['Keep']; $ServiceName = $_GET['ServiceName']; // Download original playlist $M3u8 = file_get_contents($M3u8URL); // Split playlist into individual lines $M3u8Lines = explode("\n", $M3u8); // Arrays that will contain the individual transport stream URLs and the m3u8 EXTINF information $EXTINFs = []; $URLs = []; // Count sequences processed $Sequences = 0; // Loop through all lines foreach($M3u8Lines as $line) { if (strtoupper(substr($line, 0, 8)) == "#EXTINF:") { // EXTINF found --> Add to array $EXTINFs[] = $line; } else if (strtoupper(substr($line, 0, 4)) == "HTTP") { // URL found --> Add to array and count sequences +1 $URLs[] = $line; $Sequences++; } else if (strtoupper(substr($line, 0, 22)) == "#EXT-X-MEDIA-SEQUENCE:") { // Filter out current sequence start number - needs to be updated later $MediaSequenceStart = substr($line, 22); } else if (strlen(trim($line)) > 0) { // Each other non-empty line is just echoed (assume it's a header line) echo $line . "\n"; } } echo "#EXT-X-MEDIA:NAME=" . $ServiceName . "\n"; // Adjust the starting sequence number and send it out echo "#EXT-X-MEDIA-SEQUENCE:" . ($MediaSequenceStart + $Sequences - $SequencesToKeep) . "\n"; // now send out the desired number of sequence URLs from the end of the list for ($SequenceCounter = $Sequences - $SequencesToKeep; $SequenceCounter < $Sequences; $SequenceCounter++) { echo $EXTINFs[$SequenceCounter] . "\n"; echo $URLs[$SequenceCounter] . "\n"; } ?> |
Running the above playlist through this script using http://<IP of Raspberry>:8000/m3u8shorten.php?Keep=5&TargetURL=<URL of playlist> would shorten it:
|
1 2 3 4 5 6 7 8 9 10 11 12 13 14 15 |
#EXTM3U #EXT-X-TARGETDURATION:10 #EXT-X-ALLOW-CACHE:YES #EXT-X-VERSION:3 #EXT-X-MEDIA-SEQUENCE:148754138 #EXTINF:10.000, http://daserste_live-lh.akamaihd.net/i/daserste_de@91204/segment148754138_184_av-b.ts?sd=10&rebase=on #EXTINF:10.000, http://daserste_live-lh.akamaihd.net/i/daserste_de@91204/segment148754139_184_av-b.ts?sd=10&rebase=on #EXTINF:10.000, http://daserste_live-lh.akamaihd.net/i/daserste_de@91204/segment148754140_184_av-b.ts?sd=10&rebase=on #EXTINF:10.000, http://daserste_live-lh.akamaihd.net/i/daserste_de@91204/segment148754141_184_av-b.ts?sd=10&rebase=on #EXTINF:10.000, http://daserste_live-lh.akamaihd.net/i/daserste_de@91204/segment148754142_184_av-b.ts?sd=10&rebase=on |
Note the changed line #EXT-X-MEDIA-SEQUENCE:148754138.
Having this, I now need to change the original TV station playlist to contain links to the m3u8shorten.php script. As a bonus, I include a filter by resolution. I specify a minimum resolution, and only streams that provide larger images are kept in the playlist. This avoids the effort of finding the desired services later in the service-to-channel assignment.
|
1 2 3 4 5 6 7 8 9 10 11 12 13 14 15 16 17 18 19 20 21 22 23 24 25 26 27 28 29 30 31 32 33 34 35 36 37 38 39 40 41 42 43 44 45 46 47 48 49 50 51 52 53 54 55 56 57 58 59 60 61 62 63 64 65 66 67 68 69 70 71 72 73 74 75 76 |
<?php /* This script adds to each URL in a m3u8-playlist a redirect-URL to the PHP-script that shortens the transport stream playlist to a given number of sequences. Only streams that satisfy a given horizontal resolution limit (default: 850 pixel) are kept. Hand over the following GET variables: Keep Number of sequences to keep in the rolling playlists --> Is forwarded to the shorten-script TargetURL URL of the MUX playlist that contains the rolling playlists for the services ResLimit Horizontal resolution limit to filter the streams by. Only streams providing larger x-resolution are kept. If not provided: Default = 850 pixel. ServiceName Name of the TV service - currently of no use --> Is forwarded to the shorten-script Written by Hauke April 2017 */ // Set correct content type for playlists header('Content-Type: application/x-mpegURL'); // Get GET-Variables $SequencesToKeep = $_GET['Keep']; $M3u8URL = $_GET['TargetURL']; $ServiceName = $_GET['ServiceName']; $ResLimit = $_GET['ResLimit']; // Set default if no resolution limit was specified if ($ResLimit == "") { $ResLimit = 850; } // Download original M3U8 $M3u8 = file_get_contents($M3u8URL); // Split playlist into individual lines $M3u8Lines = explode("\n", $M3u8); $ValidURL = False; // Loop through all lines foreach($M3u8Lines as $line) { if (strtoupper(substr($line, 0, 18)) == "#EXT-X-STREAM-INF:") { // Extract resolution $ResolutionTagPos = stripos($line, "RESOLUTION="); if ($ResolutionTagPos > 0) { $EndTagPos = strpos($line, ",", $ResolutionTagPos); if ($EndTagPos < $ResolutionTagPos) { $EndTagPos = strlen($line); } $Resolution = substr($line, $ResolutionTagPos + 11, $EndTagPos + 11 - $ResolutionTagPos); $XYresolution = explode("x", $Resolution); // Check if horizontal resolution exceeds limit $ValidURL = ($XYresolution[0] > $ResLimit); } else { $ValidURL = False; } // only keep URL if resolution limit is satisfied if ($ValidURL) { echo $line . "\n"; } } else if (strtoupper(substr($line, 0, 4)) == "HTTP") { // Again check for satisfied resolution limit. Lines always come in pairs, so this simple mechanism works. if ($ValidURL) { // Redirect to php script that shortens the playlist to desired number of sequences echo "http://127.0.0.1:8000/m3u8shorten.php?ServiceName=" . $ServiceName . "&Keep=" . $SequencesToKeep . "&TargetURL=" . $line. "\n"; // reset flag $ValidURL = False; } } else if (strlen(trim($line)) > 0) { // Each other non-empty line is just echoed (assume it's a header line) echo $line . "\n"; } } ?> |
So if I have this playlist from above again, coming from http://daserste_live-lh.akamaihd.net/i/daserste_de@91204/master.m3u8:
|
1 2 3 4 5 6 7 8 9 10 11 12 13 14 15 16 17 18 19 20 21 22 23 24 25 |
#EXTM3U #EXT-X-STREAM-INF:PROGRAM-ID=1,BANDWIDTH=184000,RESOLUTION=320x180,CODECS="avc1.66.30, mp4a.40.2" http://daserste_live-lh.akamaihd.net/i/daserste_de@91204/index_184_av-p.m3u8?sd=10&rebase=on #EXT-X-STREAM-INF:PROGRAM-ID=1,BANDWIDTH=184000,RESOLUTION=320x180,CODECS="avc1.66.30, mp4a.40.2" http://daserste_live-lh.akamaihd.net/i/daserste_de@91204/index_184_av-b.m3u8?sd=10&rebase=on #EXT-X-STREAM-INF:PROGRAM-ID=1,BANDWIDTH=320000,RESOLUTION=480x270,CODECS="avc1.66.30, mp4a.40.2" http://daserste_live-lh.akamaihd.net/i/daserste_de@91204/index_320_av-p.m3u8?sd=10&rebase=on #EXT-X-STREAM-INF:PROGRAM-ID=1,BANDWIDTH=320000,RESOLUTION=480x270,CODECS="avc1.66.30, mp4a.40.2" http://daserste_live-lh.akamaihd.net/i/daserste_de@91204/index_320_av-b.m3u8?sd=10&rebase=on #EXT-X-STREAM-INF:PROGRAM-ID=1,BANDWIDTH=608000,RESOLUTION=512x288,CODECS="avc1.77.30, mp4a.40.2" http://daserste_live-lh.akamaihd.net/i/daserste_de@91204/index_608_av-p.m3u8?sd=10&rebase=on #EXT-X-STREAM-INF:PROGRAM-ID=1,BANDWIDTH=608000,RESOLUTION=512x288,CODECS="avc1.77.30, mp4a.40.2" http://daserste_live-lh.akamaihd.net/i/daserste_de@91204/index_608_av-b.m3u8?sd=10&rebase=on #EXT-X-STREAM-INF:PROGRAM-ID=1,BANDWIDTH=1216000,RESOLUTION=640x360,CODECS="avc1.77.30, mp4a.40.2" http://daserste_live-lh.akamaihd.net/i/daserste_de@91204/index_1216_av-p.m3u8?sd=10&rebase=on #EXT-X-STREAM-INF:PROGRAM-ID=1,BANDWIDTH=1216000,RESOLUTION=640x360,CODECS="avc1.77.30, mp4a.40.2" http://daserste_live-lh.akamaihd.net/i/daserste_de@91204/index_1216_av-b.m3u8?sd=10&rebase=on #EXT-X-STREAM-INF:PROGRAM-ID=1,BANDWIDTH=1992000,RESOLUTION=960x540,CODECS="avc1.77.30, mp4a.40.2" http://daserste_live-lh.akamaihd.net/i/daserste_de@91204/index_1992_av-p.m3u8?sd=10&rebase=on #EXT-X-STREAM-INF:PROGRAM-ID=1,BANDWIDTH=1992000,RESOLUTION=960x540,CODECS="avc1.77.30, mp4a.40.2" http://daserste_live-lh.akamaihd.net/i/daserste_de@91204/index_1992_av-b.m3u8?sd=10&rebase=on #EXT-X-STREAM-INF:PROGRAM-ID=1,BANDWIDTH=2691000,RESOLUTION=960x540,CODECS="avc1.77.30, mp4a.40.2" http://daserste_live-lh.akamaihd.net/i/daserste_de@91204/index_2692_av-p.m3u8?sd=10&rebase=on #EXT-X-STREAM-INF:PROGRAM-ID=1,BANDWIDTH=2691000,RESOLUTION=960x540,CODECS="avc1.77.30, mp4a.40.2" http://daserste_live-lh.akamaihd.net/i/daserste_de@91204/index_2692_av-b.m3u8?sd=10&rebase=on |
And if I take this and run it through the example call
|
1 |
http://127.0.0.1:8000/m3u8makemux.php?Keep=5&ResLimit=600&ServiceName=ARD&TargetURL=http://daserste_live-lh.akamaihd.net/i/daserste_de@91204/master.m3u8 |
the result is:
|
1 2 3 4 5 6 7 8 9 10 11 12 13 |
#EXTM3U #EXT-X-STREAM-INF:PROGRAM-ID=1,BANDWIDTH=1216000,RESOLUTION=640x360,CODECS="avc1.77.30, mp4a.40.2" http://127.0.0.1:8000/m3u8shorten.php?ServiceName=ARD&Keep=5&TargetURL=http://daserste_live-lh.akamaihd.net/i/daserste_de@91204/index_1216_av-p.m3u8?sd=10&rebase=on #EXT-X-STREAM-INF:PROGRAM-ID=1,BANDWIDTH=1216000,RESOLUTION=640x360,CODECS="avc1.77.30, mp4a.40.2" http://127.0.0.1:8000/m3u8shorten.php?ServiceName=ARD&Keep=5&TargetURL=http://daserste_live-lh.akamaihd.net/i/daserste_de@91204/index_1216_av-b.m3u8?sd=10&rebase=on #EXT-X-STREAM-INF:PROGRAM-ID=1,BANDWIDTH=1992000,RESOLUTION=960x540,CODECS="avc1.77.30, mp4a.40.2" http://127.0.0.1:8000/m3u8shorten.php?ServiceName=ARD&Keep=5&TargetURL=http://daserste_live-lh.akamaihd.net/i/daserste_de@91204/index_1992_av-p.m3u8?sd=10&rebase=on #EXT-X-STREAM-INF:PROGRAM-ID=1,BANDWIDTH=1992000,RESOLUTION=960x540,CODECS="avc1.77.30, mp4a.40.2" http://127.0.0.1:8000/m3u8shorten.php?ServiceName=ARD&Keep=5&TargetURL=http://daserste_live-lh.akamaihd.net/i/daserste_de@91204/index_1992_av-b.m3u8?sd=10&rebase=on #EXT-X-STREAM-INF:PROGRAM-ID=1,BANDWIDTH=2691000,RESOLUTION=960x540,CODECS="avc1.77.30, mp4a.40.2" http://127.0.0.1:8000/m3u8shorten.php?ServiceName=ARD&Keep=5&TargetURL=http://daserste_live-lh.akamaihd.net/i/daserste_de@91204/index_2692_av-p.m3u8?sd=10&rebase=on #EXT-X-STREAM-INF:PROGRAM-ID=1,BANDWIDTH=2691000,RESOLUTION=960x540,CODECS="avc1.77.30, mp4a.40.2" http://127.0.0.1:8000/m3u8shorten.php?ServiceName=ARD&Keep=5&TargetURL=http://daserste_live-lh.akamaihd.net/i/daserste_de@91204/index_2692_av-b.m3u8?sd=10&rebase=on |
You can see that the number of URLs is reduced due to the resolution limit, and the individual URLs point to the shorten-script from above.
Basically, you could now use the example call above as the IPTV automated network URL – works!
Optional: Nice Mux Naming
Now comes a last, optional thing, adding some eye-candy. If you use the above call directly, all muxes will be named “m3u8makemux.php”. If you want them named like the TV sation, follow these steps.
First, modify /etc/lightppd/lighttpd.conf so that the mod_redirect is enabled and then create a redirect rule:
|
1 2 3 4 5 6 7 8 9 |
server.modules = ( [...] "mod_redirect", [...] ) [...] url.redirect = ( "^/muxmake/(.+)\?(.+)$" => "http://127.0.0.1:8000/m3u8makemux.php?ServiceName=$1&$2") |
Note: […] means “keep the lines inbetween”.
As a result, if I now call (notice where the TV station name comes in):
|
1 |
http://127.0.0.1:8000/muxmake/ARD?Keep=5&ResLimit=600&TargetURL=http://daserste_live-lh.akamaihd.net/i/daserste_de@91204/master.m3u8 |
this actually is redirected to the original call
|
1 |
http://127.0.0.1:8000/m3u8makemux.php?ServiceName=ARD&Keep=5&ResLimit=600&TargetURL=http://daserste_live-lh.akamaihd.net/i/daserste_de@91204/master.m3u8 |
The point of this is, that tvheadend will pick the name of the mux from what comes after the last “/” of the URL. As a result, tvheadend will now display the name of the mux as the TV station used in the nice URL from above. In my case this looks like this:
This makes service assignement easier. However, since the network name is also given on each page, this is not really needed.
Version 2: Filter by resolution and use pipe://…
A user named Torsten made me aware of the pipe://… mechanism (thank you very much again!). This involves ffmpeg, and I never considered it since I thought ffmpeg is too load heavy for the Raspberry. What Torsten pointed out is that ffmpeg can just copy a stream, without CPU intense transcoding. ffmpeg is clever enough on its own to handle the streams so that the 30 minutes of available material are skipped and the playback starts at the end of the stream, making TV live again. Basically, a mux URL needs to look like this:
|
1 |
pipe:///usr/bin/ffmpeg -loglevel fatal -re -i http://daserste_live-lh.akamaihd.net/i/daserste_de@91204/master.m3u8 -vcodec copy -acodec copy -metadata service_provider=IPTV -metadata service_name=ARD -f mpegts pipe:1 |
The really nice thing is that you can specify the parameter -metadata service_name=ARD, and this is picked up by tvheadend. As a result, the services have correct names!
Tiny issue: XBian does not come with ffmpeg. However, there is a package named avconv, which is basically the same, down to the command line options being identical. To install avconv use
|
1 |
sudo apt-get install libav-tools |
and modify the mux URL to
|
1 |
pipe:///usr/bin/avconv -loglevel fatal -re -i http://daserste_live-lh.akamaihd.net/i/daserste_de@91204/master.m3u8 -vcodec copy -acodec copy -metadata service_provider=IPTV -metadata service_name=ARD -f mpegts pipe:1 |
Only ffmpeg was replaced by avconv, all else is like above.
Now the script to redirect the streams and filter by resolution looks like this:
|
1 2 3 4 5 6 7 8 9 10 11 12 13 14 15 16 17 18 19 20 21 22 23 24 25 26 27 28 29 30 31 32 33 34 35 36 37 38 39 40 41 42 43 44 45 46 47 48 49 50 51 52 53 54 55 56 57 58 59 60 61 62 63 64 65 66 67 68 69 70 71 72 73 |
<?php /* This script transcodes each URL in a m3u8-playlist to use the pipe://-mechanism. Only streams that satisfy a given horizontal resolution limit are kept. Hand over the following GET variables: TargetURL URL of the MUX playlist that contains the rolling playlists for the services ResLimit Horizontal resolution limit to filter the streams by. Only streams providing larger x-resolution are kept. If not provided: Default = 850 pixel. ServiceName Name of the TV service - used in the avconv command Written by Hauke April 2017 */ // Set correct content type for playlists header('Content-Type: application/x-mpegURL'); // Get GET-Variables $M3u8URL = $_GET['TargetURL']; $ServiceName = $_GET['ServiceName']; $ResLimit = $_GET['ResLimit']; // Set default if no resolution limit was specified if ($ResLimit == "") { $ResLimit = 850; } // Download original M3U8 $M3u8 = file_get_contents($M3u8URL); // Split playlist into individual lines $M3u8Lines = explode("\n", $M3u8); $ValidURL = False; // Loop through all lines foreach($M3u8Lines as $line) { if (strtoupper(substr($line, 0, 18)) == "#EXT-X-STREAM-INF:") { // Extract resolution $ResolutionTagPos = stripos($line, "RESOLUTION="); if ($ResolutionTagPos > 0) { $EndTagPos = strpos($line, ",", $ResolutionTagPos); if ($EndTagPos < $ResolutionTagPos) { $EndTagPos = strlen($line); } $Resolution = substr($line, $ResolutionTagPos + 11, $EndTagPos - 11 - $ResolutionTagPos); $XYresolution = explode("x", $Resolution); // Check if horizontal resolution exceeds limit $ValidURL = ($XYresolution[0] > $ResLimit); } else { $ValidURL = False; } // only keep URL if resolution limit is satisfied if ($ValidURL) { echo $line . "\n"; } } else if (strtoupper(substr($line, 0, 4)) == "HTTP") { // Again check for satisfied resolution limit. Lines always come in pairs, so this simple mechanism works. if ($ValidURL) { // Change URL to pipe://-mechanism echo "pipe:///usr/bin/avconv -loglevel fatal -re -i " . $line. " -vcodec copy -acodec copy -metadata service_provider=IPTV -metadata service_name=" . $ServiceName . " -f mpegts pipe:1\n"; // reset flag $ValidURL = False; } } else if (strlen(trim($line)) > 0) { // Each other non-empty line is just echoed (assume it's a header line) echo $line . "\n"; } } ?> |
The IPTV automatic network URL now looks like:
|
1 |
http://127.0.0.1:8000/m3u8pipe.php?Keep=5&ResLimit=600&ServiceName=ARD&TargetURL=http://daserste_live-lh.akamaihd.net/i/daserste_de@91204/master.m3u8 |
So, if this is so easy, why not use this? I personally had two problems:
- The audio track was slightly off: Lip movements were not in snyc with the audio. I guess there is a parameter that allows correction, but I did not bother, because
- switching channels took much longer as compared to the version 1 solution.
So for me it’s version 1.
As a side remark: The mod_redirect idea is of course also possible with this approach, but even less necessary as with version 1.
Making it stable
Both versions still suffer from the service-to-channel-map-amnesia. I tried to switch off anything even remotely related to automatic updates of services, muxes, networks, bouquets etc. in tvheadend, to no avail. In the tvheadend forum I finally found a thread that addresses exactly my problem. The tipp: Store the m3u8 from the TV station locally. This is not my preferred solution, because I’ll lose any updates from the TV station, but as of now I can say that they seem to be static enough. In the end I created a dedicated directory /var/www/html/TVstations and stored the playlists there. Now the URL for the IPTV automatic network looks like this:
|
1 |
http://127.0.0.1:8000/muxmake/ARD?Keep=5&TargetURL=http://127.0.0.1:8000/TVstations/ARD.m3u8 |
And this is finally stable, now since a few weeks.
Mission accomplished.
Some afterthoughts aka. Version 3…
Since the playlists are now stored locally, in principle you could remove unwanted resolutions/streams directly in the local copy, saving you the hassle with the PHP redirect script. I think tvheadend allows you to enter a local path as URL, so no need to provide the lists by means of web server. The problem with the 30 minutes offset of course will still require a solution, either pipe or shortening. If it’s pipe, you can also include this into the local stored playlist, making PHP script #2 obsolete as well, and allows you to proceed without any web server at all.
IR remote control
Hardware: IR sensor
Using an IR remote with the Raspberry Pi and Kodi is rather simple. There are cheap IR decoder ICs available. The TSOP48xx series is rather popular (although the datasheet suggests to use TSOP44xx instead due to improved WiFi noise rejection). xx denotes the modulation frequency of the remote. Most modern IR remotes use 38 kHz, so TSOP4838 is the right choice. Still, there are many 36 kHz IR remotes existing – all with the RC5 code. The IR sensor comes at less than 1 € – when in doubt and no oscilloscope is at hand to measure the IR remote output, just order both frequencies and try it out. To my experience, mismatched 36/38 kHz combinations usually still work, there’s enough tolerance in it.
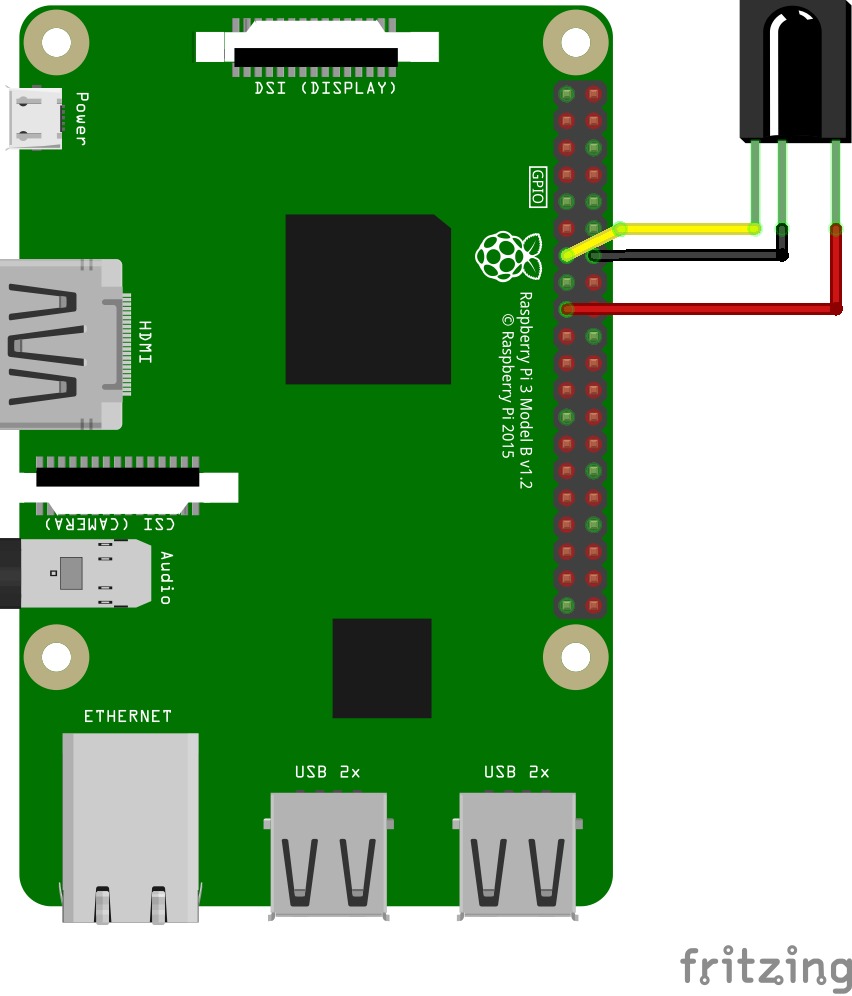
The sensor can be directly attached to the Raspberry GPIO – it needs 3.3V, GND and one GPIO pin from the header. In my case, I picked pin 13, which is GPIO 27 on the 40 pin header of Raspberry 2/3:
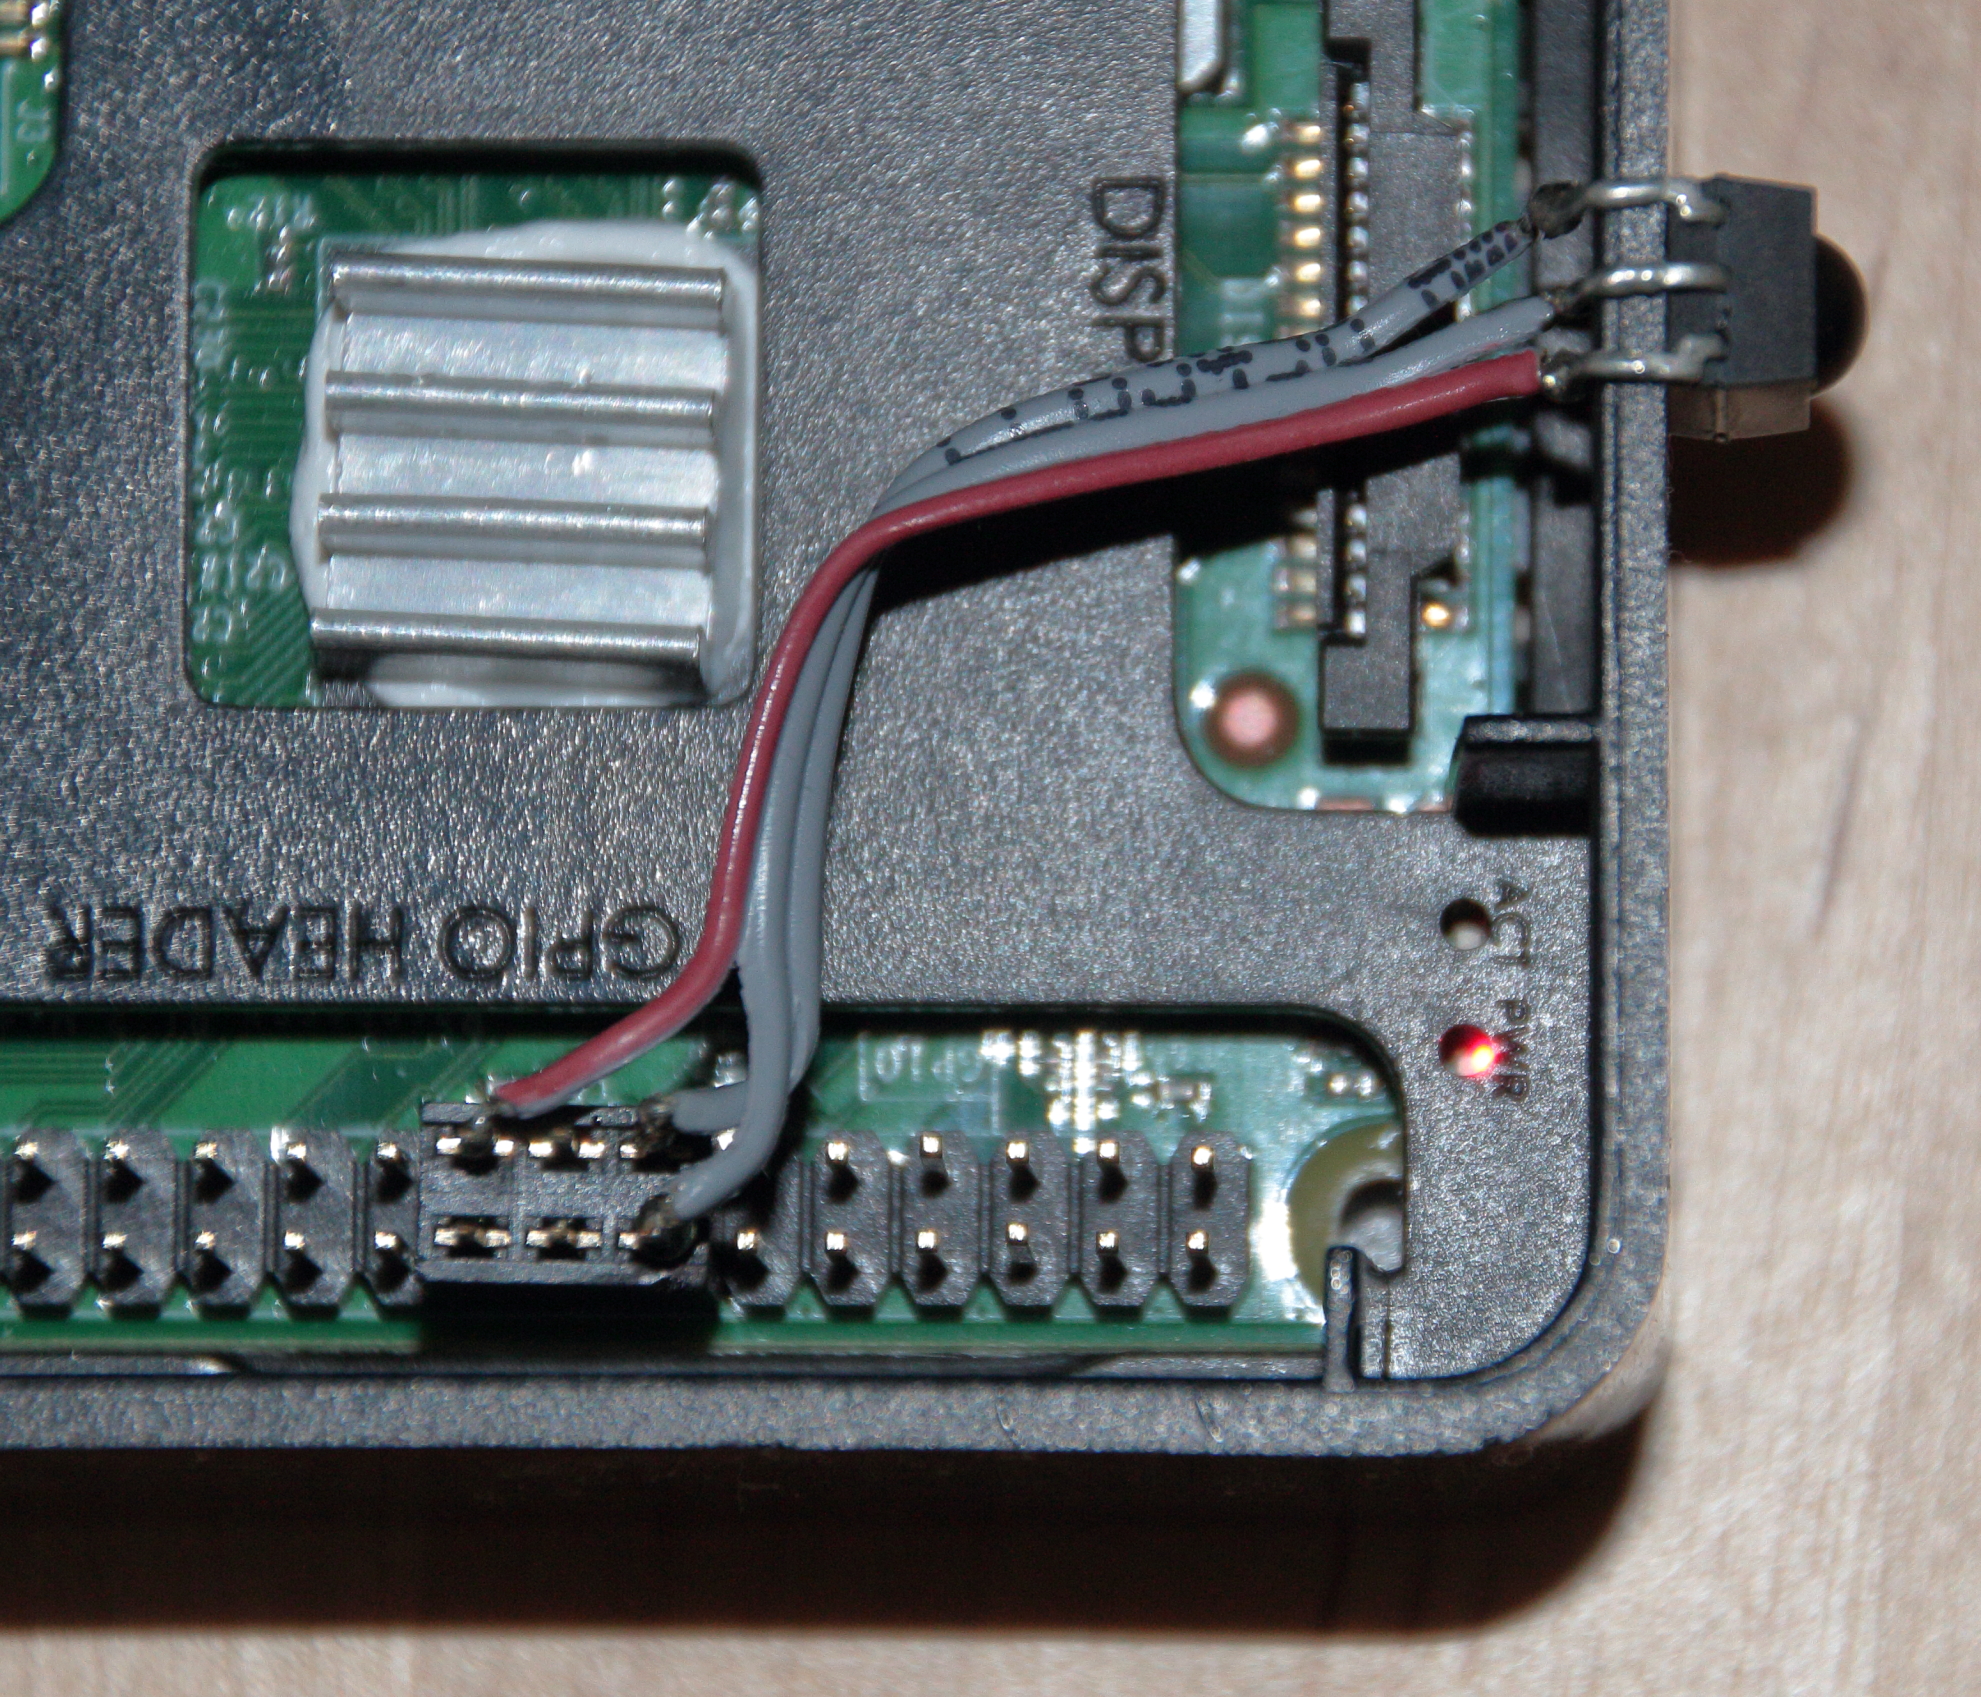
I had a 2×3 header connector lying around, so my implementation is rather simplistic:
Software: lirc
Software-wise lirc is well established and works nicely with Kodi. To install ist, again use the XBian configuration tool by logging into the system using commandline/SSH:

To configure lirc, you need to add a single line to /boot/config.txt:
|
1 |
dtoverlay=lirc-rpi,gpio_out_pin=22,gpio_in_pin=27 |
gpio_out_pin is of no importance here, and gpio_in_pin needs to be the one the sensor is attached to. And that’s it already.
Configuration: The Remote
What remains is to configure your remote control. I used the one from my DVB-T receiver, and since it is not known to lirc by default, I had to let lirc learn the keystrokes. For this, lirc needs to be stopped so that the irrecord command can access the IR sensor:
|
1 2 |
sudo service lirc stop irrecord Remote.conf |
This will create a configuration file Remote.conf, containing the now to be learned keystrokes. As a preparation, I recommend to run
|
1 |
irrecord -l |
first and put the output, which lists all possible predefined key names, in some text editor for reference. When you learn the keystrokes, pick key names from the listed namespace. This will make many commands in Kodi work out of the box. The following keys should have matchings on your remote at minimum:
| Key | Kodi Function |
| KEY_UP | Navigate through the Kodi menus |
| KEY_DOWN | |
| KEY_LEFT | |
| KEY_RIGHT | |
| KEY_ENTER | Select a menu item in a Kodi menu – in my case I picked the key labeled “OK” on the remote. |
| KEY_BACKSPACE | To exit a menu – on my remote it is labeled “EXIT”. |
| KEY_PLAY | Play/Pause/Timeshift |
| KEY_FASTFORWARD | Navigate within media |
| KEY_REWIND | |
| KEY_MENU | Access the context menu |
There were others like KEY_RECORD which I would have expected to also work, but they did not. I have to figure this out still – the fine tuning of the IR control is a task yet to be done. I’ll update this section here when I’ve done it.
To do all these assignments, just follow the irrecord instruction as displayed on the screen – it’s easy.
When finished, you need to edit /etc/lirc/lircd.conf. You’ll find many lines that refer to preconfigured IR remotes – if you happen to own one of those, you may just skip all of the learning steps above. For me, I commented all lines out by putting a # in front, and just included my own configuration:
|
1 2 3 4 5 6 7 8 |
#include "/etc/lirc/remotes/apple-a1156.conf" #include "/etc/lirc/remotes/devinput.conf" #include "/etc/lirc/remotes/smt1000t.conf" #include "/etc/lirc/remotes/srm7500.conf" #include "/etc/lirc/remotes/x10-or32e.conf" #include "/etc/lirc/remotes/xbox.conf" #include "/etc/lirc/remotes/mceusb.conf" include "/home/xbian/Remote.conf" |
Restart lirc now (or just reboot), and you’re done.
Next steps – as mentioned above – would be the fine tuning of Kodi. I didn’t do this myself yet, but will post it here when I’ve done it. There seems to be a Keymap-Editor add-on that should be helpful for this, which will be my starting point.
Final remarks
Sound [Updated]
The Raspberry Pi built-in sound is known to be not the best, and I share this opinion. My media center is connected to my stereo set, and this emphasizes the inferior quality. A rather cheap USB sound card dongle (less than 10,- €) is already enough to improve this situation. Most of them are recognized by the OS directly.
[Update] With some Mediathek-Addons the sound card caused problems. It seems that the USB implementation of the Raspberry is still not good enough to handle network traffic and USB real time data well enough. I had stuttering video/audio when watching Mediathek-Videos (e.g. the Funk-Addon or the Unithek). Switching back to Raspberry built-in audio solved this, while changing chaching parameters was of no use. Perhaps I’ll get some SPI/I²C sound card like HiFiBerry later to have good sound without the USB issues.
USB speed
To limit traffic to the SD card, I attached a USB stick to the Raspberry and made it default directory for recordings, which works fine, even when recording three streams simultaneously. But when I moved timeshift (and thereby general buffer) also to the USB stick, things went bad. TVheadend became unresponsive. Recordings still were intact, but watching TV in parallel, or even watching TV while not recording, was not good or even impossible. Without investigating deeper I’d say that USB performance is not good enough for Live TV, so I set the timeshift default directory back to /home/xbian. It is likely that this will kill my SD card at some point, but let’s see when this will be.
EPG
This is a topic I’ve only scratched the surface of. What I can say is that tvheadend built-in EPG grabbers are of no use out-of-the-box, and that legally available EPG sources are hard to find. I’m curious what the currently evolving HbbTV will bring in this regard. At some point I’ll dig into this, but this will be a seperate post.
If you have useful hints for me here, please share them as comment or PM! Thanks.
Heatsink
I realized that the Raspberry 2 CPU gets decently warm when decoding video. I do not think it is strictly necessary, but I applied a heatsink to the CPU. There was one perfectly fitting in the old DVB-T receiver 🙂
Connect-Box by Unitymedia
My ISP is Unitymedia. When extending my contract with them, they offered me the new Connect Box as replacement for the Technicolor TC7200 modem. Since the Connect Box offers much better WiFi capabilities, I accepted the offer. Big mistake: My media center startet to lose connection while streaming about once per minute. I tried around with the Kodi caching/buffering settings, with no success. Unitymedia sent a technician to check my signal levels, and he replaced amplifier and Connect Box, but no difference. So I revoked my Connect Box order, installed the Technicolor again, and I’m back to happy.
In case Unitymedia offers you the Connect Box, I’d recommend to decline.
Hi Hauke,
I just had the same problem with the NDR livestream, which is also provided by Akamai.
Found their HLS URL specs here:
https://learn.akamai.com/en-us/webhelp/media-services-live/media-services-live-stream-packaging-rtmp-ingest-hds-and-hls-outputs-user-guide/GUID-EB91F1A0-75EF-4604-9F57-61B66BB7B6C0.html
So the solution is simply to append a “dw” parameter with the desired playback in seconds to the m3u8 query string, e.g.:
http://ndrfs-lh.akamaihd.net/i/ndrfs_nds@430233/master.m3u8?dw=60
By the way, I am getting the HLS playlists from MediathekView(Web): https://mediathekviewweb.de/#query=live%20ndr
Cheers!
Hi Argus Nymus,
wow, very good hint! Actually, if this works for any Akamai link, my solution just has become obsolete! That would be great, because it adds uneccesary complexity to tvheadend, which in itself is not the easiest bit of software!
Thanks!
Hauke
Thanks for the in depth analysis of the IPTV solution.
I myself digged into a free TV approach with my project oerlie as reported here.
Currently I work on the migration of my installation to libreelec 9 alpha, where some rework on the former IPTV pipe solution is needed, as ffmpeg which was available with libreelec 8 directory /usr/bin is no longer available with libreelec 9.
My solution is based on the kodineerds m3u lists and uses the ffmpeg binary from Emby Server (service) addon as suggested by CvH. Two commands have to by issued on command line interface:
cd ~/downloads
wget bit.ly/kn-pipe-tv
sed s/usr/’storage\/.kodi\/addons\/tools.ffmpeg-tools’/g kn-pipe-tv >kn-pipe-tv-adapted
In tvheadend server configuration (port 9981) under >Configuration>DVB Inputs>Networks>[network] Edit> URL: file:///storage/downloads/kn-pipe-tv-adapted
Nice! I’d suggest that you read the comment by Argus Nymus abve – it will even simplify your project. You would not need to install the Empy Server code if I understand correctly.
I am currently waiting for a stable and fully working release of a KODI distribution (including WinTV dualHD TV card) for my Le Potato – as soon it’s there, I’ll revisit this topic and create a new setup including Argus Nymus’ idea. Will report here.
I’ll certainly have a look at the kodinerd m3u lists – I was not aware of them – I found zillions of such lists, but non well maintained. This one looks to be quite alive!
Thx..It was useful..
You gave me idea how to do something with what I have a trouble.